# Start and stop recording in Viso from The Observer XT
Combining your Viso recordings with other data may give you a more complete picture of the phenomena that you are studying. For instance, when testing your newly developed website, it may be interesting to record the test participant’s screen and annotate his/her verbal reactions but it may be even more intriguing to know what facial expressions your website evokes or what physiological responses. For the integration of all these data you can use The Observer XT.
You can automatically start and stop recording in Viso from The Observer XT and at the same time start facial expression analysis in, for instance, FaceReader (our tool for automatic analysis of facial expressions) and start the acquisition of physiological data. The data streams and Viso recordings can be imported into The Observer XT. You can then view the test participants’ actions, his/her facial expressions and physiological responses and calculate statistics.
**NOTE** To start and stop recording in Viso from The Observer XT the two programs can be on the same computer or on separate computers that are part of a local network.
### prerequisite
If Viso and The Observer XT run on separate PCs - Security certificates need to be set up and trusted on both PCs. See Appendix G ‘Security certificates’ in the Viso Setup Manual for more information.
### procedure
1. [Set up Viso to allow remote control from The Observer XT](https://bookstack.noldus.com/link/760#bkmrk-page-title)
2. [Edit the batch file](https://bookstack.noldus.com/link/760#bkmrk-edit-the-batch-file)
3. [Set up The Observer XT for live observation](https://bookstack.noldus.com/link/760#bkmrk-set-up-the-observer-)
4. [Run a test](https://bookstack.noldus.com/link/760#bkmrk-run-a-test)
## Set up Viso to allow remote control from The Observer XT
### aim
Prepare Viso to receive commands from The Observer XT.
### prerequisites
Your user role allows editing locations (Technician).
### procedure
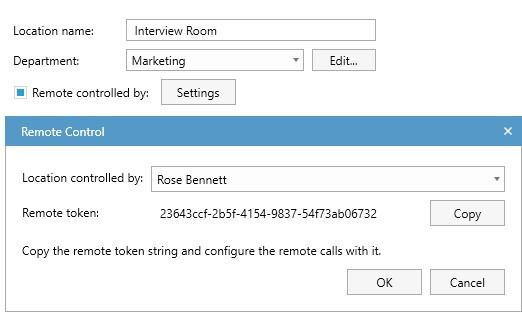
1. Open the **Locations** tab and click the pencil button of the location of your choice.
2. Select **Remote controlled by **and click the **Settings** button. A window will open with a remote token. You need this token when editing the batch file (see step 3 in [Edit the batch file](https://bookstack.noldus.com/ookstack.noldus.com/link/760#bkmrk-edit-the-batch-file)). Click **OK**. Save the token in a text file in, for instance, Notepad, and press the Copy button to copy the token for use in The Observer XT PC.
3. Select who can control the location. The drop-down list shows all users and groups of all departments and also the users that have not been assigned to a department. Select the user who will carry out the test with the test participants and click **OK**.
[](https://bookstack.noldus.com/uploads/images/gallery/2024-03/POSb4q23Ofw7NeUd-remote-control-token.jpg)
4. Repeat steps 1-3 to control more than one location.
5. Log out of Viso and ask the user who is going to run the test to log in.
**NOTE** You can also control Viso with a programmable button.
## Edit the batch file
To start and stop recording in Viso from The Observer XT you need two scripts which you can download using your MyNoldus account. You can find the scripts in the **Drivers and Tools** > **Scripts** folder, both under Viso and The Observer XT):
- RunPostCommand.bat and
- startstoprecording.ps1
Browse to my.noldus.com if you do not have a MyNoldus account yet.
### procedure - 1-PC set-up
Follow the steps below if Viso and The Observer XT run on the same PC.
1. Copy the scripts to the Viso/Observer XT PC.
2. Open the batch file (RunPostCommand.bat) in Notepad or a similar text editor.
3. Specify the location of the ps script.
[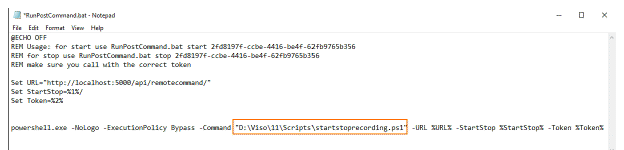](https://bookstack.noldus.com/uploads/images/gallery/2023-12/Ba0hqGyseLlV6G4Y-image.png)
4. Save the batch file.
### procedure - 2-PC set-up
Follow the steps below if Viso and The Observer XT run on separate PCs.
1. Copy the scripts to the Observer XT PC.
2. Open the batch file (RunPostCommand.bat) in Notepad or a similar text editor.
3. In the first Set line of the batch file
\- Change ‘http’ into ‘https’.
\- Replace ‘localhost’ with the computer name of the Viso PC.
\- Replace port number ‘5000’ in the third line of the batch file with ‘5001’.
**To find the Viso Services computer name
**Click the Windows icon and type system. Click System Information. You will find the name under System Name.
4. In the last line of the batch file specify the location of the ps script.
[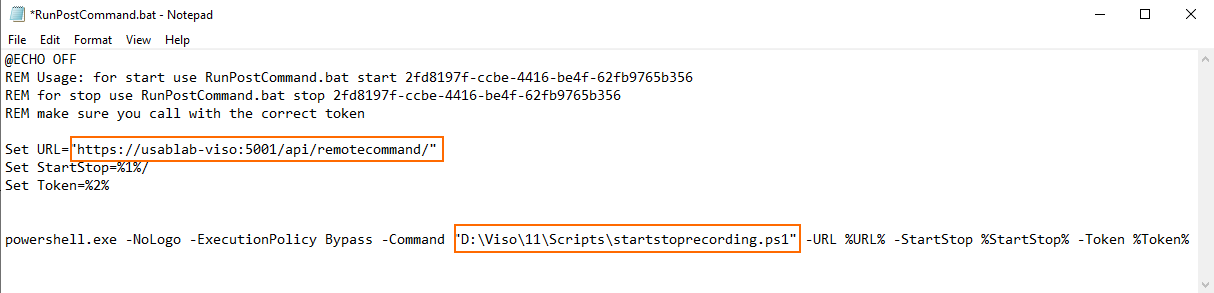](https://bookstack.noldus.com/uploads/images/gallery/2023-12/02d6S41VhQJwaXly-image.png)
5. Save the batch file.
## Set up The Observer XT for live observation
### procedure
1. Open The Observer XT and create a new project.
2. Choose **Setup >Project Setup** and select **Live Observation**. The **Devices** window opens. If not, click the Devices button.
3. Click **Add external program**. The **Add External Program** window opens.
[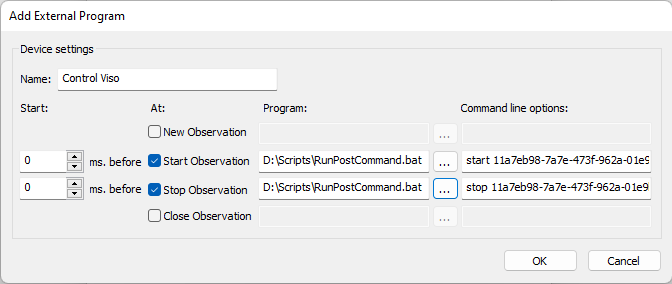](https://bookstack.noldus.com/uploads/images/gallery/2023-12/5w4x6Tx428XrNDgS-image.png)
4. In the **Name** field, enter ‘Control Viso’ or a similar name to indicate that these are the settings to control Viso.
**TIP**: Add the Viso location name when controlling multiple locations from The Observer XT.
5. Select the checkbox next to **Start Observation**.
6. In the same row, click the ellipsis button next to the **Program **field and browse to the batch file (RunPostCommand.bat).
7. Select the file and click **Open**.
8. In the **Command line options** field enter ‘start <token generated in Viso for the location>’. This instructs Viso to start recording when you start an observation.
9. Select the checkbox next to **Stop Observation**.
10. In the same row, click the ellipsis button next to the **Program** field and browse to the batch file (RunPostCommand.bat).
11. Select the file and click **Open**.
12. In the **Command line options** field enter ‘stop <token generated in Viso for the location>’. This instructs Viso to stop recording when you stop an observation.
13. Leave the **ms. before** fields of the lines **Start Observation** and **Stop Observation** empty.
14. Click **OK**. The **Devices** list now shows a new device with the name you gave in step 4. Select the checkbox in front of it.
15. Repeat steps 3-14 if you want to control more than one location.
## Run a test
### procedure
1. Invite the participants to enter the test room and check that the cameras are well positioned.
2. Create a new observation in The Observer XT.
3. Start the observation in The Observer XT. Depending on the settings, the Independent Variable List appears.
4. Enter the values of the independent variables and click **OK**.
5. Video recording in Viso starts. Please note that video recording does not start immediately, there is a delay.
6. Optionally - Manually annotate events in The Observer XT or in Viso. For more information about manually annotating in Viso see Chapter 6 of this Reference ([Annotations).](https://bookstack.noldus.com/link/743#bkmrk-page-title) To be able to annotate events in Viso you will need the[ Annotation module.](https://bookstack.noldus.com/link/743#bkmrk-page-title)
7. Stop the observation in The Observer XT. Video recording in Viso stops.
8. In Viso enter a name for your session. If you specified a default session name, the session automatically gets a name.
## notes
- Video recording in Viso does not start immediately when Viso gets the command from The Observer XT. There is a delay. If the delay is less than 10 seconds The Observer XT takes it into account when you import the video. It automatically gives the video an offset relative to the start of the event log. If the delay is more than 10 seconds The Observer XT gives a warning informing you that the delay is, for instance, 10.66 seconds. You need to manually enter this offset in The Observer XT.
- The videos that you record in Viso are not automatically imported in The Observer XT. Please see The Observer XT Help for the procedure (File Management > Import Media Files).
- You can also [Import Viso sessions into The Observer XT](https://bookstack.noldus.com/link/761#bkmrk-page-title).