Viso12 - Reference Manual
- Introduction
- Welcome to Viso
- Welcome to Viso
- How to use this Help
- Introduction
- Important definitions
- User Management
- What's new in Viso 11?
- What's new in Viso 12?
- Prepare session recording
- Locations and Sessions
- Pan, Tilt, and Zoom
- Save PTZ presets
- Video layout
- Change Audio source and volume in preview
- Talk to people in location
- Specify a default session name
- Create and edit groups
- Invite participants
- The Viso interface
- Log in
- Tabs
- Dashboard
- Locations
- Sessions
- Scheduler
- Codes
- Select locations for recording
- Select one location and record a session
- Select multiple locations to record separate sessions for each location
- Select multiple locations to record a composite session
- Sessions
- Annotations
- The Annotation Module
- Annotation Module, important terms
- Create Codes Lists
- Annotate
- Enter a remark
- View annotations
- Playback events
- Edit scored subjects, markers and remarks
- Select another Codes list
- Change the annotator
- Reclaim the role of annotator
- Customize the Session window
- Export annotations to text file
- Highlight videos
- Schedule Session Recording
- Making an audit report
- Viso with The Observer XT
- Start and stop recording in Viso from The Observer XT
- Import Viso sessions into The Observer XT
- Import sessions directly
- Export sessions in Viso and import them in The Observer XT
- How Viso annotations appear in The Observer XT
- Further analysis with The Observer XT
- Technical Support
- Keyboard shortcuts
- The Viso Web App
Introduction
Information in this document is subject to change without notice and does not represent a commitment on the part of Noldus Information Technology bv. The software described in this document is furnished under a license agreement.
The software may be used or copied only in accordance with the terms of the agreement.
Copyright © 2024 Noldus Information Technology bv. All rights reserved. No part of this publication may be reproduced, transmitted, transcribed, stored in a retrieval system, or translated into any other language in whole or in part, in any form or by any means, without the written permission of Noldus Information Technology bv.
Viso is a registered trademark of Noldus Information Technology bv. Other product names are trademarks of their respective companies.
Documentation: Olga Krips, Viktor Kovacs, Leanne Loijens
February 2024
Noldus Information Technology bv
International headquarters
Wageningen, The Netherlands
Phone +31-317-473300
Fax +31-317-424496
E-mail info@noldus.nl
For addresses of our other offices and support, please see our website www.noldus.com
Welcome to Viso
Welcome to Viso
Main topics
- How to use this Help
- Introduction
- Important definitions
- User management
- What's new in Viso 11?
- What's new in viso 12?
How to use this Help
TIP If you do not see the table of contents, enlarge the Help window or zoom out the characters (Ctrl+mouse wheel, or Ctrl+-).
TIP To search for two or more adjacent words (e.g. review session), use quotes (“review session”).
Introduction
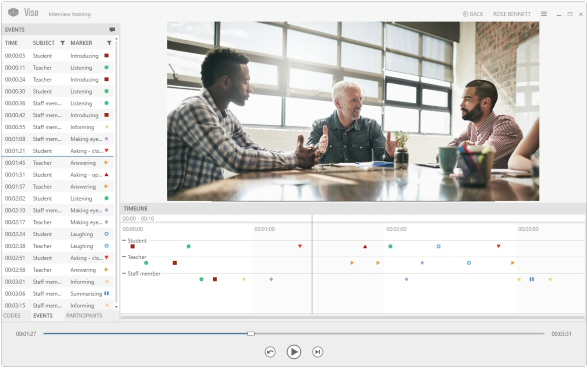
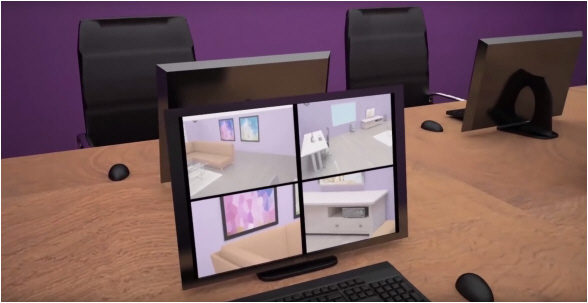
Viso® is a powerful tool to record video and audio in multiple independent locations. Record with up to four Pan-Tilt-Zoom cameras in each room. Control session recording from any computer in your local network, so that the persons under study are not disturbed by the recordings. Annotate the behaviors of the observed persons. Play the recorded sessions back for debriefing. And invite others to view the sessions with you.

Viso modules
Viso is modular, which means that you can make the setup entirely to your needs.
Base module
The Viso Base Module allows you to record sessions in a number of locations with up to four cameras in each location. The number of locations is determined by your license. User management ensures that session viewing, recording, or management can only be done by those whose user role allows it.
See User management for an overview of the rights of each user role.
Annotation Module
With the Annotation Module you can mark events that are of interest in your session and enter free text as remarks. When debriefing the session, you can easily jump to an episode using the scored markers and remarks.
The sessions can be exported to the annotation software The Observer XT, for further analysis.
Scheduler Module
With this module you can schedule sessions in advance. The Scheduler has several options to customize the view entirely to your needs.
Important definitions
IMPORTANT The terminology in this Help may differ from what you see in Viso, since your colleague who manages the Setup account may have changed it in the program. Locations may, for example, be called Rooms and Sessions Recordings. Also markers, subjects and user roles may have different names. Contact your colleague if you have questions on the terminology.
Location
A location is an area with cameras, for example an observation room, or a usability test room.
Session
By default, a Session is one recording with all cameras in one location. With the default settings, you obtain two or more sessions if you record with all cameras in two or more locations. However, those with a Technician account can select the option to start recording in multiple locations simultaneously.
Multiple-location sessions
Ask your colleague with the Technician account whether selecting multiple locations for simultaneous recordings is possible in your Viso setup. If this is the case, there are two options:
- Separate sessions – Viso records a session for each selected location. If you selected four locations, you will get four sessions.
- Composite session – Viso records one session for all locations combined. You will get one session, independent of the number of selected locations.
Department
A group of users who work together, using the same locations for recording. They can invite each other to watch live tests or recorded sessions. Users of a department only have access to the locations that have been assigned to that department. Users of different departments do not see each other in the software and cannot interact.
Group
By defining groups you can easily assign identical rights to a number of users, for instance, the right to view a session live or the right to review it after it has been recorded.
Subject
If your Viso license includes The Annotation Module, you can annotate sessions. Subjects are the individuals that show the behavior you are interested in. Examples of subjects are, Test participant 1, Mother, Father, Child, Doctor, Patient. Since the subjects are likely to vary between sessions, you define roles rather than names or identities as Subjects. So Mother and Child rather than Mrs Sanchez and Joanna.
Marker
If your Viso license includes The Annotation Module, you can score markers in your sessions. Markers are used to annotate events of interest, for example the start of a counseling session, or a usability test. Markers have no duration, they mark a moment in time.
Codes list
Subjects and Markers are organized in Codes Lists.
Remarks
If your Viso license includes The Annotation Module, you can enter remarks in your sessions in case something unexpected happens that you did not define as a marker. For example if a visitor enters the room. Like markers, remarks have no duration.
User Management
Viso has five user roles that differ in rights to work with the program. This ensures that actions in Viso, like managing users and locations, session recording, and session viewing, can only be done by those whose user role allows it. Users that have rights to create sessions can invite others to view them.
Your colleague who manages the Viso set-up specifies the user role of each user. The Viso Setup Manual contains a full description of the rights per user role. The table below summarizes the rights of the different user roles.
|
|
Setup |
Technician |
Administrator |
Trainer |
Trainee |
|
Manage terminology* |
|
|
|
|
|
|
Manage session recording options* |
|
|
|
|
|
|
Upgrade Viso license* |
|
|
|
|
|
|
Manage users* |
|
|
|
|
|
|
Manage locations* |
|
|
|
|
|
|
Force-stop recording* |
|
|
|
|
|
|
Manage departments* |
|
|
|
|
|
|
Define groups* |
|
|
|
|
|
|
Create Codes list a |
|
|
|
|
|
|
Record sessions |
|
|
|
|
|
|
Schedule sessions b |
|
|
|
|
|
|
View and review sessions |
|
|
|
** |
*** |
|
Manage sessions * |
|
|
|
** |
|
|
Log in via Viso Web App |
|
|
|
|
|
|
Start and stop recording with Viso Web App* |
|
|
|
|
|
|
Make an audit report |
|
|
|
|
|


* This information is present in the Viso Help.
a With the Annotation Module
b With the Scheduler Module
** Sessions that the Trainer has recorded, sessions of which he/she received session ownership, sessions for which he/she received annotator rights and sessions for which he/she has been invited.
*** Sessions of which the Trainee received ownership, sessions for which he/she received annotator rights and sessions for which he/she has been invited.
NOTE Trainees do not have the rights to schedule or record sessions and create codes lists. Therefore the tabs Locations, Scheduler, and Codes are not present for a Trainee.
What's new in Viso 11?
Allocate locations to departments
In Viso 11 we introduce the concept of departments. Your colleague who maintains the Viso set-up can assign locations to departments. Each location can be assigned to one department. The users (Administrators, Trainers and Trainees) that belong to a department can be linked to that Viso department. For instance, your school may have purchased a Viso system to train students in the field of nursing and students that study skin therapy. By assigning each student to one of the two departments he/she has access to the locations and sessions that belong to that department but not to the locations/sessions of the other department.
Group users
By defining groups you can easily assign identical rights to a number of users, for instance, the right to view a session live or the right to review it after it has been recorded. Groups can either be public or private.
Auto delete sessions
Your colleague who maintains the Viso set-up can set a time after which your sessions will be auto deleted. This is a GDPR/HIPAA requirement. You can secure sessions that you want to retain. These sessions will not be auto deleted.
Picture-by-picture view in Viso Web App
In Viso 10.7 you can view the cameras in a location simultaneously, in a picture-by picture view in the Viso Web App. In Viso 11 you can also view the videos of a session in a picture-by-picture view.
PTZ control in the Viso Web App
If your Viso set-up includes PTZ cameras you can now not only control them in the regular Viso software but also in the Viso Web App, including zooming in and out.
Transfer session ownership
Session owners can manage sessions (delete and rename sessions, etc.). You can give another user (for instance, your colleague) the right to manage your session.
Change session annotator
By default, the annotator is the person who recorded the session. This person can assign the role of annotator to a colleague or a student or reclaim the role of annotator.
Upgrading Viso easier
When your colleague who maintains the Viso set-up upgrades Viso from version 10.7 the Viso database is backed up automatically. The installation of Viso 11 consists of two steps, one step less than for older versions of the software.
Control Viso from The Observer XT or by using a programmable button
Session recording in Viso 11 can be started and stopped from The Observer XT, our tool for manual annotation and data integration. You can also use a programmable button to control Viso.
Secure RabbitMQ connection
Viso versions 11.0.8620 and higher allow the use of security certificates to secure RabbitMQ messages. RabbitMQ is a core item used in N-Linx, Noldus’ network communication protocol. It controls the message traffic between Viso Services, Viso Recorder and Viso Viewer. For information on how to set up a secure connection see ‘Install Viso Services with a secure connection.
What's new in Viso 12?
Software based licensing fully integrated in Viso
You can activate or deactive your software license from the Viso application directly.
The license key needs to be able to check its validity online at least every 90 days. The 90 days check counter is reset after a successful license check. If the license check has not been successful after 90 days, your license becomes suspended. Please contact support when this happens.
Highlight videos
In the Annotation module, you can now create highlight videos which summarise the most interesting point events of your sessions to be used e.g. in presentations or lectures. To these highlight videos, you may add your markers and remarks as subtitles.
The right to manage recording options moved to Technicians
Those with a Technician account can now enable multiple location recording, including composite and separate sessions.
Allocate groups to departments
When creating groups, now the department where the group belongs can also be provided.
Data Transparency Policy
When a new user logs in, a pop-up window will appear, informing the user about Noldus's Data Transparency Policy.
Prepare session recording
Locations and Sessions
By default, a session is a recording with all cameras in one location. To create sessions, your user role must allow session recording.
Main topics
- Pan, Tilt, and Zoom (PTZ) the cameras. This is only possible if the camera has Pan, Tilt, and Zoom control.
- Save PTZ presets
- Change the Video layout
- Change Audio source and volume in preview
- Use Talk to people in location to talk to the persons in the location.
- Specify a default session name
- Create and edit groups to view the session.
Pan, Tilt, and Zoom
aim
Pan, Tilt and Zoom the camera to obtain a proper view of the subjects under study.
prerequisites
- Your user role allows session recording (Technician, Administrator, or Trainer).
- You have opened a location.
See Select locations for recording - The camera can Pan, Tilt, and Zoom. Ask your colleague who manages the Viso set-up whether this is the case.
See Select locations for recording
procedure
- Open the location.
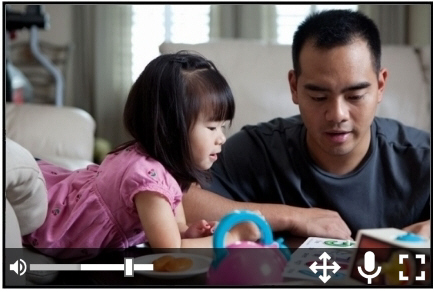
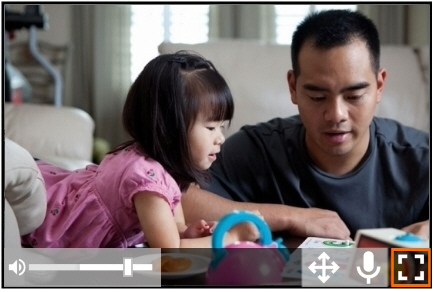
See Select locations for recording - Hover with your mouse over the camera image. The toolbar appears at the bottom of the image.

- Click the PTZ button to enable or disable PTZ control.

- PTZ control appears in the middle of the image and your mouse pointer becomes a small point. Click the camera image and keep your left mouse button pressed to control the camera. The camera image moves in the direction of the point. The further away from the PTZ control you click, the faster the camera moves.

-
Zoom in and out with your mouse wheel.

See also Save PTZ presets
NOTE See Record sessions in Keyboard shortcuts how to manage the PTZ menu with your keyboard.
Save PTZ presets
aim
To save the new camera view so that you can return to it easily.
prerequisites
nYour user role allows session recording (Technician, Administrator, or Trainer).
nYou have opened a location.
See Select locations for recording
nThe camera can Pan, Tilt, and Zoom. Ask your colleague who manages the Viso set-up whether this is the case.
See Select locations for recording
procedure
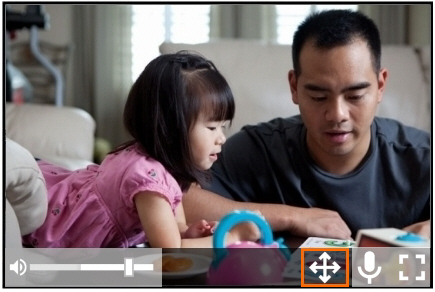
- Hover with your mouse over the camera image and click the PTZ button on the toolbar.
This opens the PTZ preset menu. The buttons shown below appear.

-
To save a camera position, click one of the save buttons.

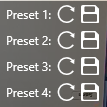

To return to a PTZ preset
Click one of the arrows to return to a PTZ preset.

NOTE The PTZ presets are stored per location. So if you or another user opens a location with Viso on another computer, the same pr esets are present. You can store four presets per location.
NOTE See Record sessions in Keyboard shortcuts how to manage the PTZ menu with your keyboard.
Video layout
aim
To choose the position of your videos on your screen.
IMPORTANT The changes do not affect the recordings. The cameras and video resolutions are selected by your colleague who manages the Viso set-up. All available cameras will always be used for recording.
prerequisites
- Your user role allows session recording (Technician, Administrator, or Trainer). Alternatively, you are invited to view the session.
- You have opened a location.
See Select locations for recording
procedure
First, open the location.
Select locations for recording
To change the order of videos
Drag and drop videos to change their position on your screen.
To show one video full size
Do one of the following:
- Double-click it.
- Press Ctrl+Shift+[video number]. If you do not know the video number, open the View Settings pane (see next step). The video number is superimposed on the video image.
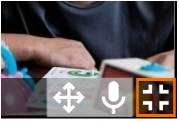
- Hover over the camera image and click the Full size button on the toolbar that appears.

To display the previously shown videos again, do one of the following:
- Press Esc.
- Double-click the video.
- Press Ctrl+Shift+[any video number].
- Hover over the camera image and click the Restore button on the toolbar that appears.

To show/hide videos and to change the distribution of the videos on your screen
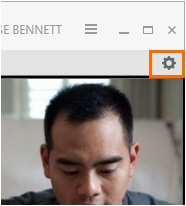
- Click the settings wheel on the toolbar to open the View Settings pane. Here you can change the way the videos are displayed.

-
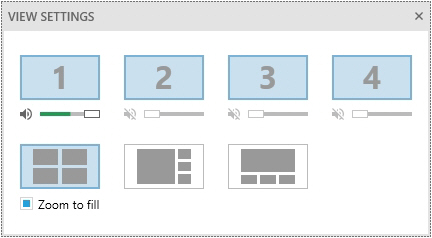
If the location has more than one camera, the video numbers are superimposed on the video images when you open the View settings pane. Optionally click a video number in the View settings pane to hide a video. This does not disable recording that video. Click the video number once more to show it again.

-
Optionally, change the layout of the videos on your screen. You have the following options:

The space where videos are displayed divided in equal parts.

One large video with the other ones displayed smaller at the right-hand side.

One large video with the other ones displayed smaller at the bottom.
-
By default all videos are zoomed to fill the available space completely. To disable this, deselect Zoom to fill.


NOTE By default Viso divides the space where videos are shown in equal parts. If you have one video, it uses the full available space. If you have two videos, the available space is divided in two halves next to each other. if you have three or four videos, the available space is divided in four equal parts.
NOTE The size of the displayed videos depends on whether you selected Zoom to fill and also on the video resolution set by your colleague who manages the Viso set-up. If the video resolution differs between videos, and you did not select Zoom to fill, they may not have equal size in the video layout.
Zoom to fill may cause the sides of the video to disappear. These sides are recorded, but in the Zoom to fill these disappear. If you want to see the sides, deselect Zoom to fill.
Change Audio source and volume in preview
aim
To select which audio source to hear in Viso and to adjust the volume. By default you hear only the audio from the first camera.
IMPORTANT The changes do not affect the recordings. Microphones and audio volumes for the recordings are selected by your colleague who manages the Viso set-up. All available audio sources will always be recorded.
prerequisites
- Your user role allows session recording (Technician, Administrator, or Trainer). Alternatively, you are invited to view the session.
- You have opened a location.
See Select locations for recording
procedure
- Open the location.
See Select locations for recording - Hover over a camera image. A toolbar appears at the bottom of the camera image.

- Click the speaker symbol under a camera number
 to mute or unmute the audio from that source. Move the slider to adjust the volume.
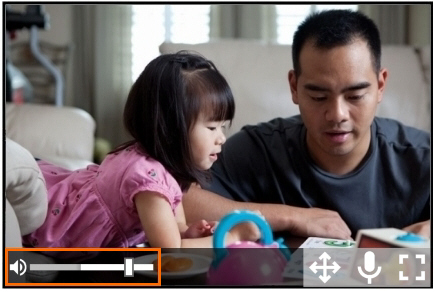
NOTE If no speaker symbol or volume slider appear, your colleague who manages the Viso set-up did not select audio for this video source.
NOTE If the same audio source is selected for all cameras, mute/unmute will apply to all of them together.
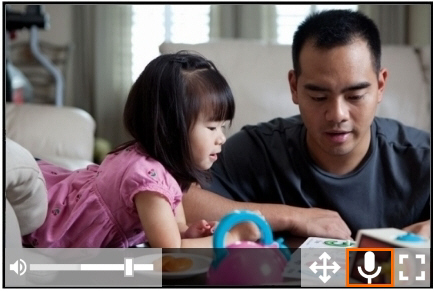
Talk to people in location
aim
To talk to the people in the location through the camera speaker. This is, for example, useful if you want to tell the test participants where to be seated, or when to start the test.
prerequisites
- Your camera has a speaker and allows push-to-talk. Ask your colleague who manages the Viso set-up if the push-to-talk option is available in your locations.
- You have a microphone connected to the computer with Viso, or your computer has a built-in microphone.
- Your user role allows session recording (Technician, Administrator, or Trainer).
- You have opened a location.
See Select locations for recording
procedure
- Open the location.
See Select locations for recording - Hover with your mouse over a camera image. The toolbar appears at the bottom of the image. It contains the push-to-talk button if the camera has a speaker and allows push-to-talk.

- Click and hold the push-to-talk button and speak through the microphone. The persons in the location should now hear you. Keep the button pressed while you speak.
Specify a default session name
aim
To set a default name for your sessions. Your sessions will be saved with the default name, followed by a consecutive number.
prerequisite
- Your user role allows session recording (Technician, Administrator, or Trainer).
procedure
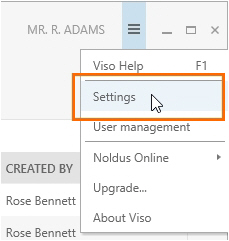
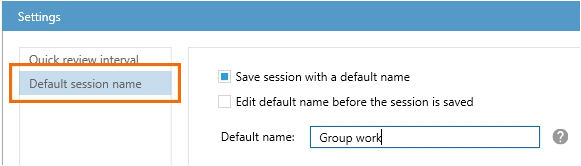
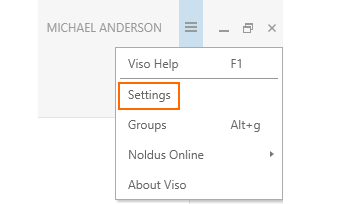
- Click the Menu button at the top of the Viso window and choose Settings > Default Session name.

- Select Save session with a default name and enter a name in the Default name field.

- Optionally, select Edit default name before the session is saved. This way you can give the session another name than the default one with a consecutive number. This is, for example, useful if you want to add the name of the subject to the session name.
Create and edit groups
aim
To give groups of users identical rights, for instance, permission to view your session live or to review it after it has been recorded. As a Trainer you can, for instance, create groups of students (Trainees).
prerequisites
Your user role (Technician, Administrator, Trainer) allows creating groups.
procedure
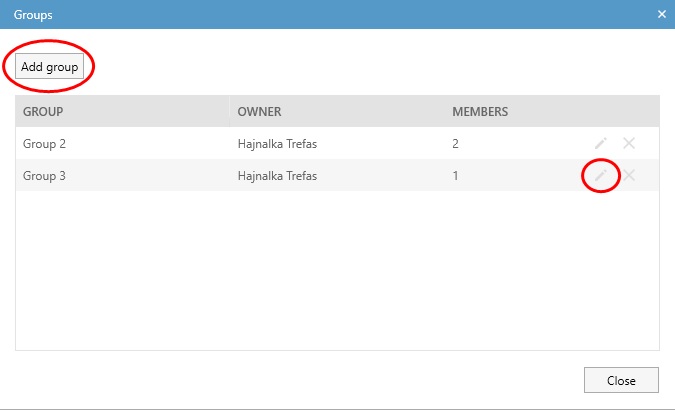
- Click the menu button and choose Groups.
- If you wish to create a new group, click Add group and enter a name for the group of users. If you wish to edit an existing group, click on the editing icon in its row.

- Select whether the group is private or not. If you want, for instance, Trainer B to see your groups, make the groups public (leave the Private group checkbox unselected) and make Trainer B a group member. Trainer B can then invite your groups to view his/her sessions.
- Select the Department where your group will belong.
- From the list of users within the chosen Department, select the ones you want to add to the group, using the checkboxes. For multiple selection, use the Ctrl or the Shift key the usual way and then press the space key. It will change the status of the checkboxes of all the selected users. When you wish to remove users from a group, follow the same steps and uncheck the relevant boxes. Please note the following:
- As an Administrator or Trainer, you will only see the users of your own department
- As an Administrator, you will not be able to add yourself to a public group; however, you can remove yourself from such groups, if you have been previously added. If you wish to be added to a public group, you will need to ask a Technician. Please note, however, that Technicians can only add users to a public group from the same department.
- Click Save.

NOTE To give other users rights, for instance, to view your session live or to review it afterwards, you have to invite them, please see Invite participants.
NOTE As a Trainer, you cannot edit the public groups created by other users; however, you can use these.
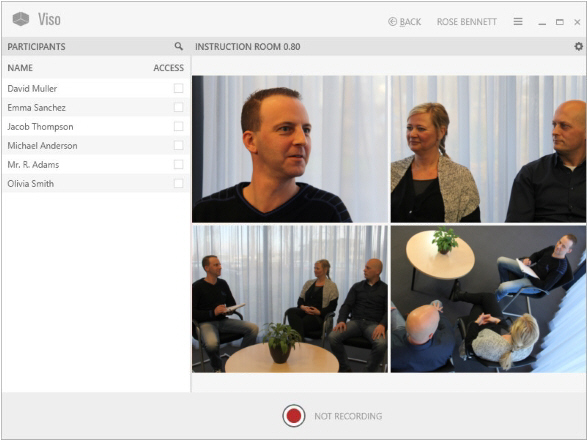
Invite participants
aim
To give other users permission to view your session live and to review it afterwards.
prerequisite
Your user role allows session recording (Technician, Administrator, or Trainer).
procedure
- To invite a participant or group of participants to view a session while it is recorded, select the location or locations.
See Select locations for recording. Continue with step 2.
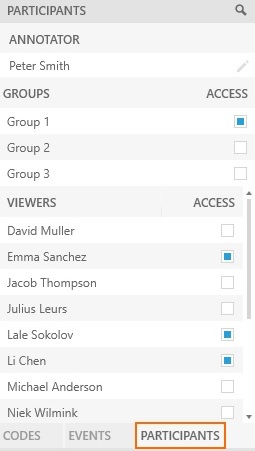
To invite a participant or group of participants to view a recorded session, open the Sessions tab. Double-click the session. Continue with step 2. - Open the Participants pane at the bottom-left of your window.
- Click the checkbox next to a participant name or group name to send an invitation.

To open a session upon an invitation
The invited participants receive an invitation message with which the session can be opened. The dashboard of the invited users also lists the session. A participant that is invited to view a session recording can also review it afterwards.
Invitations for multiple-location sessions
How participants are invited and what they can view differs between separate sessions and composite sessions.
Separate sessions
Each location results in a separate session. Therefore, a session invitation gives access to one location only. It is possible to invite different participants in different locations. The invited participants can view only that location, also if the user that records the session closes it and opens another one.
Composite sessions
The recordings in all locations are combined in one session. An invitation for a composite session gives access to all locations in that session.
During session recording, invited participants see the location that is open on the screen of the user that records the session. If the user that records the session switches locations, the invited participants will also see the new location.
During session playback, the invited participant can browse through all the locations of the composite session with the carousel control.
Notes
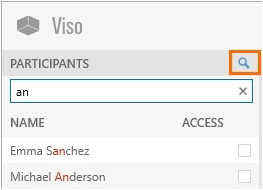
- To search participants, click the search button at the top of the Participants pane. Enter text in the search field.

-
To withdraw a session invitation, open the Participants pane and deselect the checkbox next to the name.
-
Scored Markers and Remarks are not shown if you view a session live while it is being recorded by another user. They are shown if you review a previously recorded session. You must have The Annotation Module to score and view markers and remarks.
-
Once the recording is stopped, the invited user is not able to view the location anymore. However, he or she can review the recorded session.
The Viso interface
Log in
aim
To start working with Viso you need to log in with the login name and password that you received from your colleague who manages the Viso set-up.
procedure
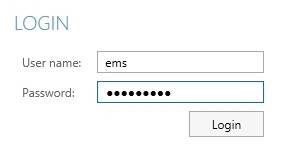
- Start Viso.
- Enter the login details supplied by your colleague who manages the Viso set-up.

Notes
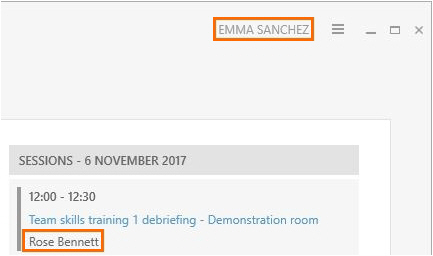
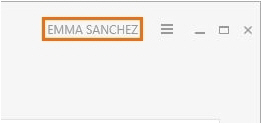
- When you are logged in, your user name is shown in the top-right corner of the Viso window. Click it to change your password or log out.

- TIP Change your password the first time you log in. To do so, click your name in the top-right corner and choose Change password. You can only change your password if you are a local Viso user.
- Contact your colleague who manages the Viso set-up if you have lost your password.
- You can only be logged in once in Viso, independent whether this is via the regular Viso interface or via the Viso Web App. If you log in a second time, you will be logged out on the other Viso instance or webpage.
Tabs

The Viso interface has the following tabs:
- Dashboard
- Locations
- Sessions
- Scheduler (if you have the Scheduler Module)
- Codes (if you have the Annotation Module)
Viso modules and user roles
The interface depends on your Viso license and your user role. The Scheduler tab is present when you have the Scheduler Module, the Codes tab when you have the Annotation Module. The Locations tab is present when your user role allows session recording.
Dashboard
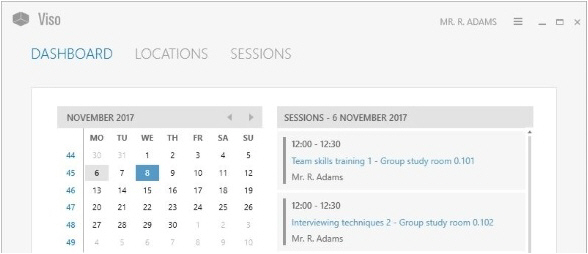
Viso opens with the dashboard which includes a calendar and a sessions list. Days in bold indicate when sessions that you created or received an invitation for were recorded. Click on a date in the calendar to view these sessions. A session that is being recorded or has been recorded has a link to open it.
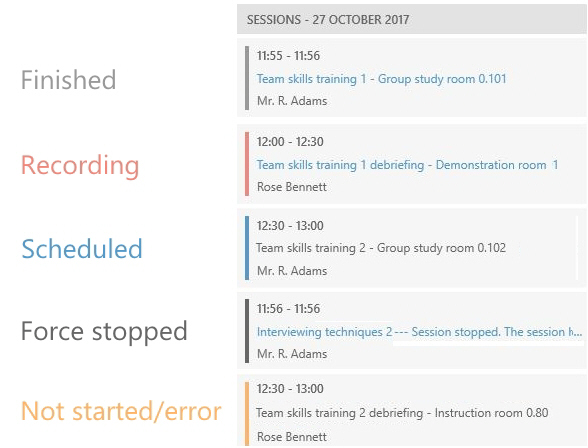
Session color coding
Recorded sessions are marked with a color in the Dashboard and in the Scheduler. The following colors are used.
Locations
The Locations tab is present for those whose user role allows session recording. It contains a list of the locations that are set up by your colleague who manages the Viso set-up.

Double-click a location to open it and start recording.
See Sessions

Location status
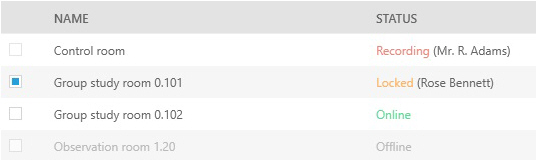
Locations can have the following status:
- Online – Available for recording.
- Locked – The Location is opened by another user. Administrators and Technicians can open the location, but cannot start session recording. Trainers and Trainees can only open the location if they received an invitation for the session.
- Recording – Recording takes place in that location. Administrators and Technicians can open the location, but cannot start session recording. Trainers and Trainees can only open the location if they received an invitation for the session.
- Offline and grayed out – The location has not been selected for recording by your colleague who manages the Viso set-up.
- Configuration warning – One camera, or some of the cameras in the location are not configured correctly. Consult your colleague who manages the Viso set-up to solve this. You can record with the cameras that are online.
- Configuration error and grayed out – None of the cameras in the location are configured correctly. Consult your colleague who manages the Viso set-up to solve this. You cannot open the location.
NOTE For Technicians, the Locations tab contains an Edit locations button. Technicians can add and edit locations. See the Viso Setup Manual for details.
Sessions
The Sessions tab contains the list with recorded sessions that you are entitled to review. For Technicians and Administrators, the Session tab lists all recorded sessions. For Trainers, only the sessions that they created themselves, received session ownership of, were assigned as annotator for or received an invitation for are listed. For Trainees, the list contains the sessions they received ownership of, were assigned as annotator for or received an invitation for.
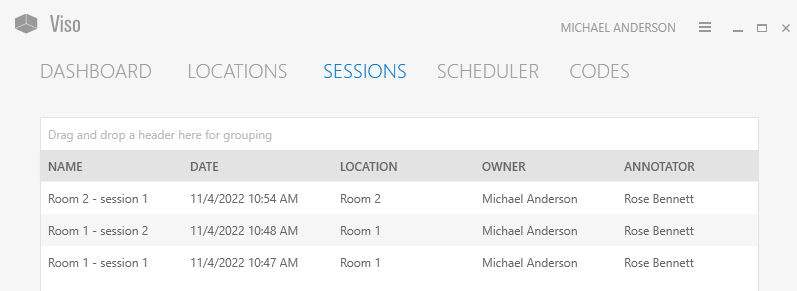
Double-click a session to open it for review.
See Review sessions
Scheduler
The Scheduler tab is available if you have the Scheduler Module. In this tab you can schedule your session recordings in advance.

Codes
The Codes tab is available if you have the Annotation Module. In the Codes tab you can create Codes lists with Subjects and Markers. This can be done by Technicians, Administrators and Trainers.

Use the codes list to annotate your sessions.
See Annotations
Select locations for recording
What do you want to do?
- Select one location and record a session
- Select multiple locations to record separate sessions for each location
- Select multiple locations to record a composite session
If you have the Scheduler Module, see also Schedule Session Recording.
Select one location and record a session
aim
To select one location for a single session recording.
prerequisite
Your user role allows session recording (Technician, Administrator, or Trainer).
procedure
1. In the Locations tab, double-click the name of the location in which you want to start recording.

2. A preview of the cameras in the location appears. The toolbar displays the location name.
3. Continue with the third chapter of the Reference (Prepare session recording)
NOTE The location is locked for recording by others at the moment you select it in the Locations list.
NOTE You can also record a single session with the Viso Web App, see The Viso Web App
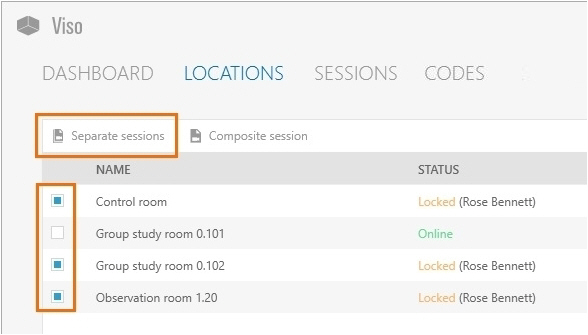
Select multiple locations to record separate sessions for each location
aim
To select multiple locations for simultaneous session recording. Each location results in a separate session.
Prerequisites
- The setup account enabled multiple-location recording.
- Your user role allows session recording (Technician, Administrator, or Trainer).
procedure
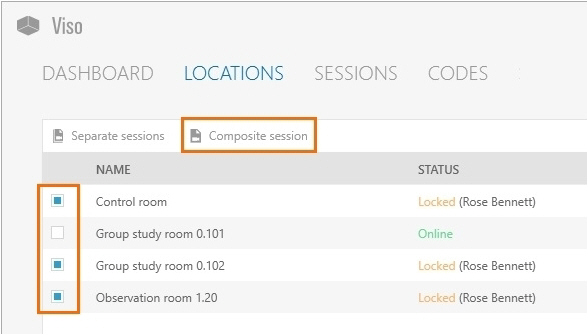
- In the Locations tab, select the locations.
- Click the Separate sessions button on the toolbar.

-
A preview of the cameras in the location that you selected first appears. The toolbar displays the carousel control.
The carousel control
The location you selected first is displayed in the middle of the carousel control.
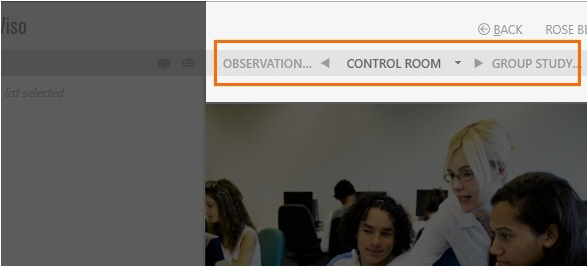
The location displayed on the right is the location you selected second.

The location displayed on the left is the location you selected last.

To open locations with the carousel control
Do one of the following:
- Press the carousel control buttons to browse through the locations.
- Press the Page up and Page down button on your keyboard.
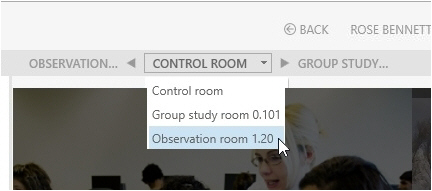
- Click the down arrow next to the location in the middle and select another location from the list.
To set up the locations
See the third chapter of this Reference (Prepare session recording) for the procedure. Follow the procedure for each location.
NOTE If you selected only two locations, the second is displayed on the left as well as on the right in the carousel control.
NOTE The Separate Sessions button is enabled once you selected multiple locations. Separate session recording is supported with a maximum number of eight locations with two cameras each.
Select multiple locations to record a composite session
aim
To select multiple locations for simultaneous recording. All recordings are combined in one session.
prerequisites
- The Technician account enabled multiple-location recording.
- Your user role allows session recording (Technician, Administrator, or Trainer).
procedure
- In the Locations tab, select the locations.
- Click the Composite session button on the toolbar.
A preview of the cameras in the location that you selected first appears. The toolbar displays the carousel control.
See The carousel control and To open locations with the carousel control control to set up the locations
See the third chapter of this Reference (Prepare session recording) for the procedure. Follow the procedure for each location.
NOTE The Composite Session button is enabled once you selected multiple locations.
NOTE Composite session recording is supported with a maximum number of eight locations with two cameras each.
Sessions
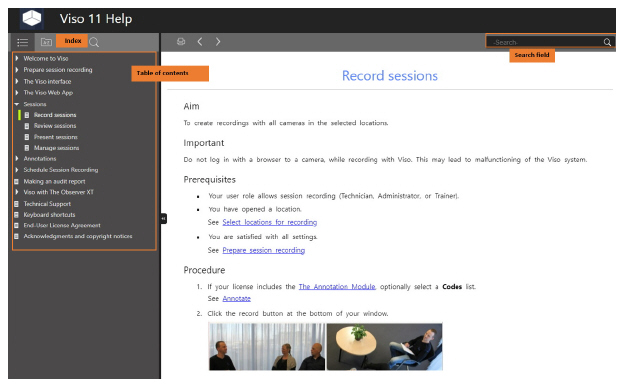
Record sessions
aim
To create recordings with all cameras in the selected locations.
Important
Do not log in with a browser to a camera, while recording with Viso. This may lead to malfunctioning of the Viso system.
prerequisites
- Your user role allows session recording (Technician, Administrator, or Trainer).
- You have opened a location.
See Select locations for recording - You are satisfied with all settings.
See the third chapter of this Reference (Prepare session recording)
procedure
- If your license includes the The Annotation Module, optionally select a Codes list.
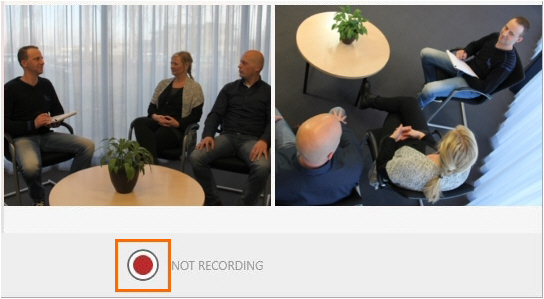
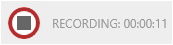
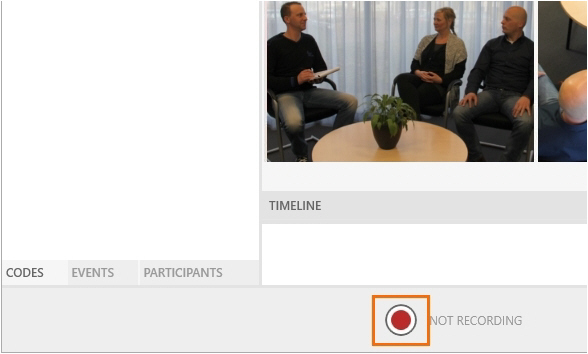
- Click the record button at the bottom of your window.
Next to the button the text Recording appears and the recording duration is shown.
TIP It is also possible to View locations and start and stop recording with a web browser. See the The Viso Web App.
- Optionally, score events and make remarks (If you have The Annotation Module)
- Optionally, talk to the people in the location with the Talk to people in location functionality.
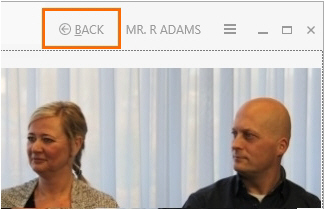
- To start recording in other locations, click the Back button at the top of the window to return to the Viso start window. Repeat the steps above to start recording in other locations.

-
To stop recording, open the location if it is not already open.
Then click the stop recording button.
note If you selected multiple locations for separate or composite session recording, pressing the stop recording button in one location, stops recording in all locations. - A question appears whether you want to stop the session. Click Yes. The following steps depend on whether you recorded a single session, selected multiple locations for separate sessions, or selected multiple locations for a composite session.


If you recorded a single session
- If you did not specify a default session name, a Save session window appears. Enter a name and click Save session.
- If you specified a default session name, the session automatically gets this name followed by a consecutive number.
- If you selected the option to edit the default session name before saving, each session automatically gets the same default name. Optionally, edit this name before you save it.
See also Specify a default session name
If you started recording in multiple locations manually
You must stop recording in each location separately. After stopping a session, click the back button on the toolbar and open the next location to stop recording there.
See If you recorded a single session how session naming is done.
If you selected multiple locations for separate session recording
- If you did not specify a default session name, a Save session window appears once. Enter a name and click Save session. Each session gets the same name.
- If you specified a default session name, each session automatically gets this name followed by the same consecutive number.
- If you selected the option to edit the default session name before saving, each session automatically gets the same default name. Optionally, edit this name before you save.
See Select multiple locations to record separate sessions for each location
If you selected multiple locations for a composite session recording
The result of your recording is a single session. See If you recorded a single session how session naming is done.
See Select multiple locations to record a composite session
Notes
- Session recording can only be stopped by the user that started the recording, or by a Technician.
- You can also View locations and start and stop recording with a web browser. See The Viso Web App,
- Recording stops automatically if the computer that stores the video files runs out of disc space. This is shown in the session name. Contact your colleague who manages the Viso set-up if this happens.
- If you log out while a session is recorded, recording continues, even if you shut down the computer with Viso. Log in again to stop the recording.
- The Status column in the Locations tab shows in which locations recording takes place by which user. Locations that are locked or in which recording takes place can be opened and viewed by others if they have the rights to. However, session recording is disabled for those users. Locations that are offline are not selected for recording by your colleague who has the user role Technician.
TIP Click one of the column headers to sort the locations by name or status, for example to list all locations in which recording takes place in the first lines of the table.
- There can be multiple sessions with the same name. Sessions with the same name can be distinguished in the sessions list by the recording date and time.
See Review sessions
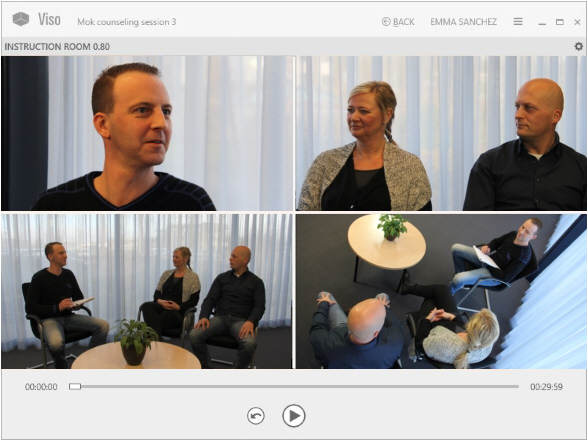
Review sessions
aim
To play back recorded sessions. If your license includes the Annotation Module you can also play back the scored markers and events.
prerequisites
You either have rights to review the session (Technician, Administrator), you created the session (Trainer), you have received ownership or annotator rights or you are invited to view the session.
procedure
- Open the Sessions tab for a list of all the sessions.

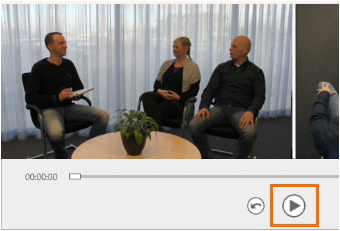
-
Double-click a row to open a session.
-
Click the play button to play it back.

To review an event
If you want to play back a specific event, set a pre-roll interval to start playing a few seconds prior to the event.
By default the pre-roll interval is set to 5 seconds. The maximum duration you can set is 15 seconds. If you do not want to have a pre-roll, set the value to 0.
To review a composite session
If your session consists of multiple locations, use the carousel control to view the different locations.
See To open locations with the carousel control

The Timeline shows when a location change takes place.

Use the carousel to view the video in the next location, for instance when following a participant from one room to another.
To change the video layout
Optionally, change the video layout in the same way as with recording sessions.
See Video layout
To change the audio
Optionally, change the playback audio in the same way as with recording sessions.
See Change Audio source and volume in preview
To review the last time fragment
Click the quick review button to let the video jump back and replay the episode. Click it multiple times to replay a longer episode.

By default, the video jumps back five seconds. To select another time interval, click the Menu button at the top of the Viso window and choose Settings > Playback settings. Next, specify the interval. You can also control here if you want to pause after quick review or continue the playback.
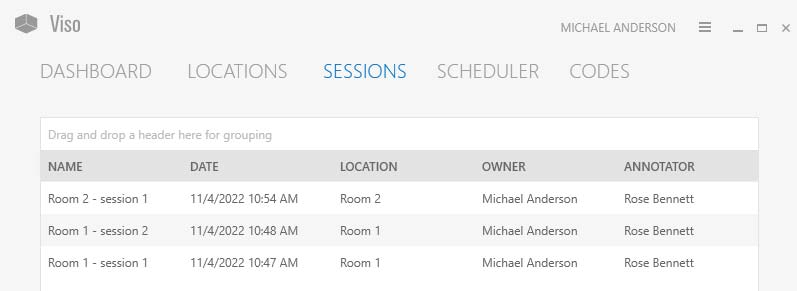
Session sorting options
Click one of the column headers to sort the sessions, by name, date, location, the person that owns the session or the person that has been assigned as the annotator.
To group sessions, for example by the user that created them, drag that column header (Created by in this example) to the top of the table.
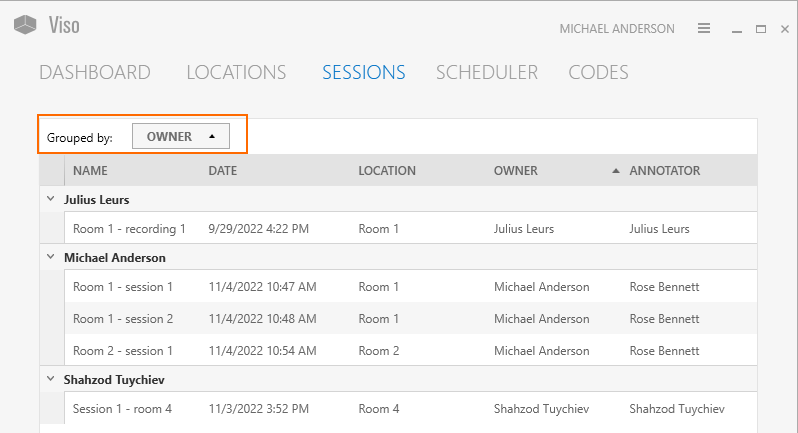
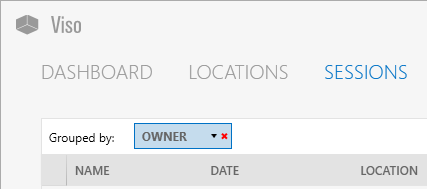
Unfold a group to see the individual sessions. Click the red cross to remove grouping.
You can drag multiple column headers to the top of the table to make groups and subgroups of sessions.
Present sessions
aim
To present a session full screen on another screen, for example with a beamer or on a large monitor in a debriefing room.
prerequisites
- You connected the Viso computer to a secondary display and selected this as extended display. To do so, press Windows key + P and select Extend.
- You either have rights to present the session (Technician, Administrator), you created the session (Trainer), you have received ownership or annotator rights or you are invited to view the session.
procedure
- Open a Session.
See Review sessions - If you have a Composite session, select the location to display.
See To open locations with the carousel control - Optionally, change the Video layout or Change Audio source and volume in preview
- Click the settings button on the toolbar to open the View Settings pane.
- Choose the display from the Presentation display list.

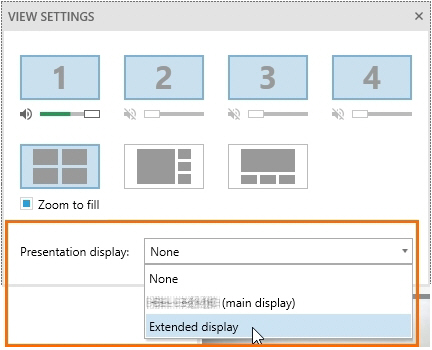
NOTE Markers and remarks that are scored with The Annotation Module are not shown on the second display. This way you can debrief the session while the audience cannot see your annotations. This is especially useful if the markers and remarks are confidential, or if you debrief a session with students and do not want them to see your annotations about them.
NOTE If you connect a display while Viso is open, close and restart the program. The new display is now visible in Viso.
Manage sessions
aim
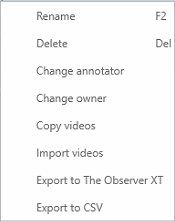
To rename or delete sessions, change the annotator or the owner of a session, import videos, or export videos for external use.
prerequisites
- Technicians can manage sessions of all users. Administrators can manage sessions owned by users of their department. Trainers can manage their own sessions, sessions of which they received ownership and sessions for which they received annotator rights. Trainees can manage sessions of which they received ownership.
- You have opened the Sessions tab.
- Make sure the Recorder Manager is running during these actions.
Rename sessions
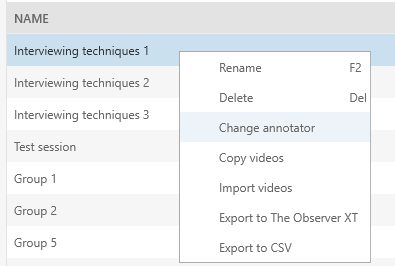
Right-click a session and select Rename.
Delete sessions
Right-click a session and select Delete. Please note that this also deletes all videos from a session.
Secure/unsecure sessions
Sessions will be auto deleted, by default after 90 days, if your colleague who maintains the Viso set-up selected this option in the settings. To retain a session, right-click it in the Sessions list and select Secure/unsecure. The Retention column in the Sessions list shows whether a session has been secured.
Change the annotator
In the session list under Annotator you can see who has been assigned the role of annotator. Right-click a session and select Change annotator to assign the right to annotate the session to another user. By default, the annotator is the person who recorded the session. This person can assign the role of annotator to a colleague or a student or reclaim the role of annotator.
Change the owner of a session
Session owners can manage sessions (delete and rename sessions, etc.). In the session list under Owner you can see who is the session owner. Right-click a session and select Change owner to give another user the right to manage the session. If you transfer the ownership of a session to, for instance, your colleague, he/she will automatically be assigned as the annotator of the session.
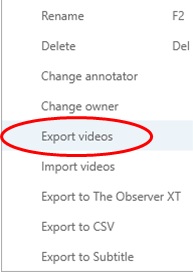
Export videos
- To export videos, for example, to use them in a presentation, right-click the session and select Export videos.

- Specify the destination folder where to export the videos.
- Choose if you want to export separate videos or combine all videos into one picture-by-picture video per location.

- Press Export.

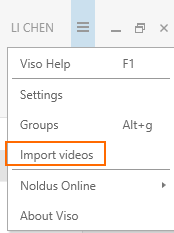
Import videos
To import a video, right-click anywhere in the session list and select Import videos. Alternatively, click the Menu button at the top of the Viso windows and choose Import videos.
The selected videos will be added to a new session, and the files are copied to one of the available video locations used by Viso.
On the Import video dialog, the name of the videos to import, the newly created session name, and the Location needs to be specified. (Beforehand you need to define at least one Location to be able to import videos)
The imported session name by default will take the title of the first video, but it can be modified after the video selection.
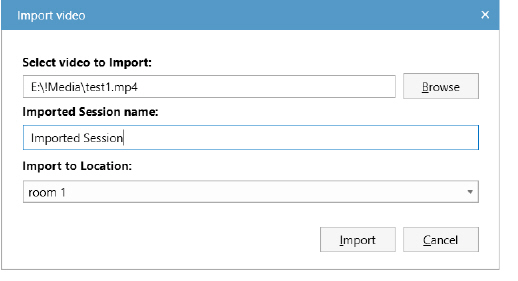
The video files will be copied to one of the available video locations used by Viso. The preferred choice is the folder used for moving sessions to (a user with the user role Technician is able to set this up). Alternatively, the video folder of the Viso Recorder Manager can be used as a destination for the imported videos. There must be enough space on those file locations for the newly imported video files.
Up to 4 videos can be selected at once, which all will be added to the same new session. It is assumed that the videos are all created at the same time, they must have the same start date and time, a maximum of 5 second deviance is allowed. There is no separate synchronization option.
Currently it is not possible to create composite sessions through importing videos, or adding videos to existing sessions.
The imported videos must be .mp4 files or .mov files with H264 encoding and AAC audio. In the case of mov files they are converted to mp4 on import.
Creating H264 Videos on new Apple devices
Some newer Apple devices create MOV files using the HEVC (H265) format. This format is not recognised on Windows 10 and Windows 11 by default, and is not supported in Viso. You can set these devices to capture media using the older formats, which are more broadly compatible with other devices and operating systems:
- Go to Settings > Camera.
- Tap Formats.
- Tap Most Compatible. This setting is available only on devices that can capture media in HEIF or HEVC format, and only when using iOS 11 or later.
- All new photos and videos will now use JPEG or H.264 format. To return to using the space-saving HEIF and HEVC formats, choose High Efficiency.
Annotations
The Annotation Module
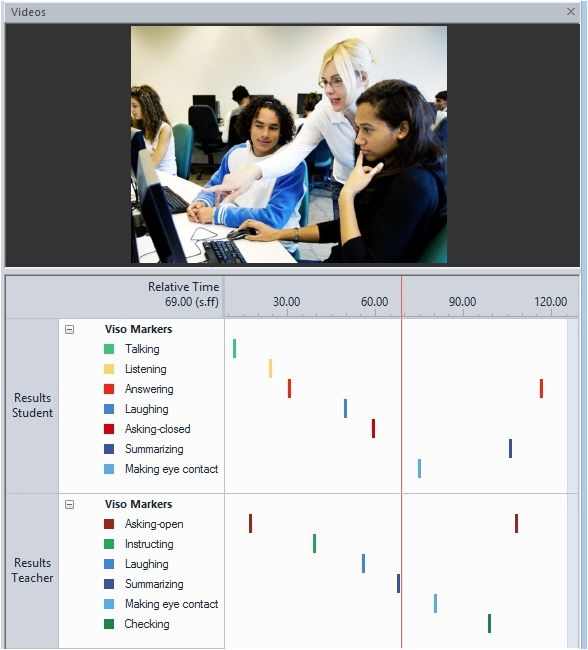
If your Viso license includes the Annotation Module, you can mark events that are of interest for your study. For example, in a classroom, the onset of the Instruction phase, and Group work phase. Optionally, link markers to subjects, for example to mark a question by the teacher and the answer by a student. Markers specify a moment, and have no duration.
Mark events during session recording, or while reviewing it. To annotate, first enter the key code of the subject and then the one of the marker. Use the scored markers to jump to an episode of interest. This is especially useful to debrief certain episodes.
Optionally, you can assign the role of annotator to a colleague or one of your students.
The Annotation Module also allows you to enter free text as remarks while the session is being recorded. This is useful if something happens during the observation that you did not define as a marker beforehand. For example, if another teacher enters a classroom while you record group work by the pupils.
Using the Annotation Module, you can also create highlight videos which summarise the most interesting point events of your sessions to be used e.g. in presentations or lectures. To these highlight videos, you may add your markers and remarks as subtitles.

Viso in combination with The Observer XT
Videos from sessions recorded with Viso can be opened in the annotation software The Observer XT. Scored subjects, markers and remarks can be imported into The Observer XT to further analyze the session. Of course it is also possible to create a coding scheme and further annotate the sessions for more advanced analyses.
See Viso with The Observer XT.
Annotation Module, important terms
Subjects
Subjects are the individuals in your study. Define subjects if you are interested in different behaviors for different persons or animals. For example if you observe teaching skills for teachers and work attitude for students.
Since it is likely that you study different individuals in each session, do not define the names or identities as subjects, but define the roles. So define Teacher and Student instead of Mr. Jones and Mark.
You do not have to score subjects. If you mark only episodes and general events in your test, for example Test 1, Test 2, or Instruction Phase and Test phase, do not define subjects. Also do not define subjects if you observe only one individual in each session. You cannot score subjects only.
Markers
With Markers you can mark events that are of interest for your study. Markers mark a moment in time and have no duration. Use a marker to mark the start of a phase in your study, or the start of a behavior of your test persons or animals. Examples or markers are start of Open question by a therapist and Answer by a client, or Instruction by the teacher and Work in parallel for students. Examples of markers without subjects are Start of test 1, or Start of counseling session
Remarks
With a remark you can enter information as free text if something unexpected happens that you did not define as a marker beforehand. Like with markers, you can only enter a remark if you are logged in.Your user account must include the rights to enter remarks (Technician, Administrator, Trainer). Remarks are not connected to a subject. If you want to connect the unexpected event to a subject, add a marker instead.
Codes list
Subjects and markers are organized in codes lists. This makes it easy to select the correct codes for your specific session. For example you can make two different codes lists for a parent-child observation and for a classroom observation. A codes list can contain maximally 36 subjects and 36 markers, so for each category you can use all letters and numbers on your keyboard. You can make as many codes lists as you want, but you can only use one codes list per session.
You can only create codes lists and annotate if you are logged in.Your user account must include the rights to create codes lists (Technician, Administrator, Trainer).
Event log
The Event log is your record of the scored Subjects, Markers and Remarks in your Session.
Timeline
In the Timeline the scored events and remarks are plotted against time.
Annotator
The person who has the right to annotate a session. By default, the annotator is the person who recorded the session. This person can assign the role of annotator to a colleague or a student or reclaim the role of annotator. The annotator can make his or her own Codes list or use an existing Codes list. Trainees can only use existing Codes lists. If you transfer the ownership of a session to, for instance, your colleague, he/she will automatically be assigned as the annotator of the session. Changing the annotator of a session does not automatically change the owner.
Highlight video
When creating Highlight Videos, you can export sections of your sessions with point events of special interest, potentially adding subtitles created from Markers or Remarks. You may export these point events of special interest individually or merged into a single video file.
Create Codes Lists
aim
To specify the events of interest for your study. Subjects and markers are organized in codes lists. Each list can contain maximally 36 subjects and 36 markers.
prerequisites
- Your license includes the Annotation Module.
- Your user role allows creating codes lists (Technician, Administrator, or Trainer).
procedure
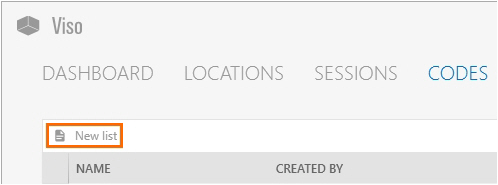
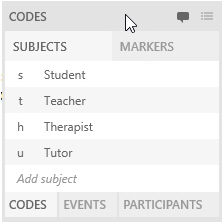
- Open the Codes tab.
- Click New List.

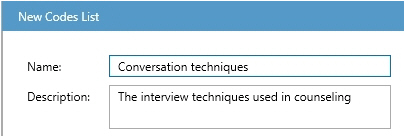
- Name the list and, optionally, add a description.

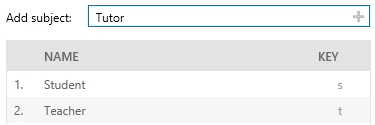
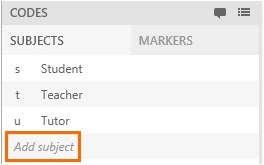
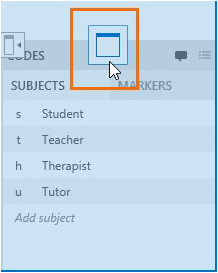
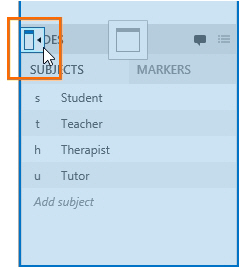
- Optionally, add subjects by entering them in the Add subject field and clicking the + button, or pressing the Enter key.

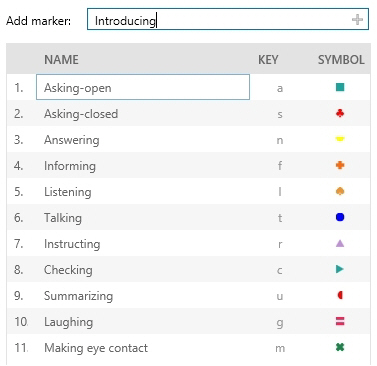
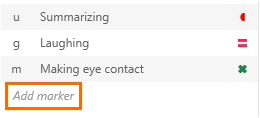
- Add markers by entering them in the Add marker field and clicking the + button, or pressing the Enter key.
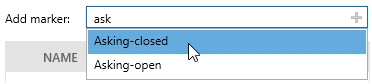
If you already created other codes lists, the name of similar elements appear if you enter the first letter in the Add subject or Add marker field. Select the subject or marker you want to add to the list.
Notes
- New subjects automatically get a key code. New markers automatically get a key code, shape and color. Within one list, a key code can only be used once. The key code is by default the first letter from the subject or marker name that has not been used for other markers in the same list yet. You can change the key code, shape and color manually.
- To change the order of subjects and markers in the codes list, drag and drop them.
- Codes lists cannot be edited, to ensure that they contain the same markers in all the sessions in which you use this list. You can duplicate and then edit a list and save it with another name. To do so, right-click a list in the Markers tab and select Copy and edit.
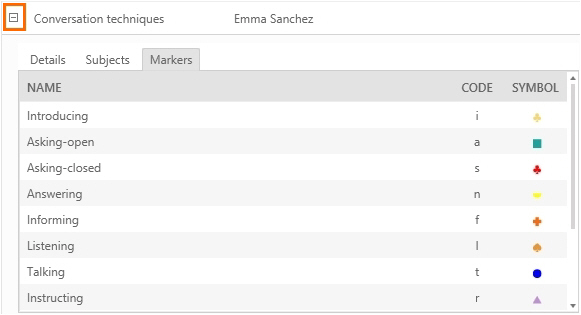
- To view details of a Codes list, open the Codes tab and click the + button in front of it to unfold the item.
Annotate
aim
To score markers during session recording, or afterwards while playing the recorded session back.
prerequisites
- Your license includes the Annotation Module.
- To annotate during session recording, your user role allows recording (Technician, Administrator, or Trainer).
- To annotate a session while playing it back, you recorded the session, received session ownership or have been assigned as the annotator.
To annotate during session recording
procedure
- Open a location.
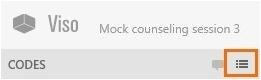
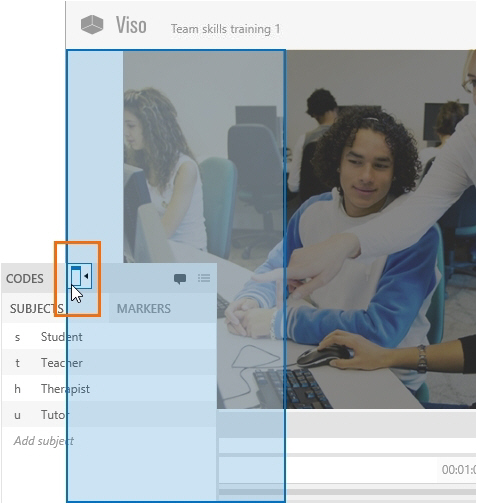
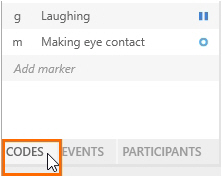
If you selected multiple locations, use the carousel control to open the location. See To open locations with the carousel control. - Click on Codes in the lower-left corner of your screen to open the Codes tab.

- Click this button and select the correct list. This is possible until you score the first Subject or Marker.
- Optionally pan, tilt, or zoom the cameras and select which microphones to hear in the preview.
See Select locations for recording - Start recording.

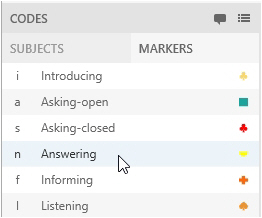
- Annotate by clicking the subjects (optional) and markers in the Codes window or by pressing the associated keys on the keyboard.
If you defined subjects, score the subject first and then the marker. As soon as the subject is scored, the Markers tab in the Codes window opens so you can score the marker. The moment the subject is scored is recorded as timestamp.
To score markers without a subject, open the Markers tab manually in the Codes window, or press Ctrl + /. Then score the marker.
If you did not define subjects, score the markers either in the Codes window, or with the keys on your keyboard.

See also Annotations in a multiple-location recording
To add codes during session recording
IMPORTANT The added subjects and markers are saved for the present session only. They are not stored in the Codes list for future sessions.
If you have a multi-location recording and selected Separate sessions, the codes are stored for the session that is open on your screen only.
procedure
- Subject - open the Subjects tab and click Add Subject. Enter a name and accept the default keycode or choose another one.

- Marker - open the Markers tab and choose Add Marker. Enter a name and accept the default keycode and symbol or choose other ones.

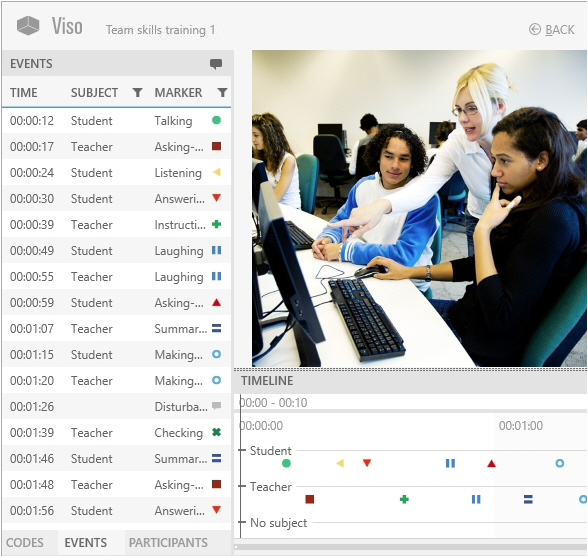
How annotations appear
The scored annotations appear in the Event log and the Timeline.
Event log
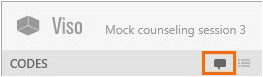
To view the Event log, open the Events pane at the bottom-left side of your window.
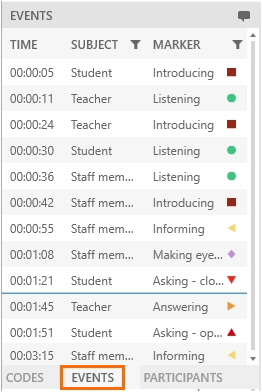
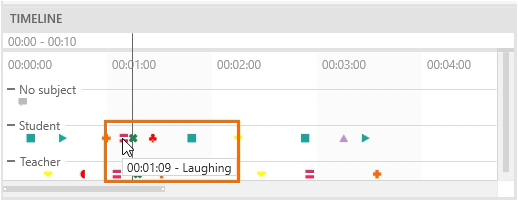
Timeline
In the Timeline, the events are plotted against time. Subjects are listed vertically. The markers are displayed horizontally on the Timeline. During session recording, the subjects are shown in the order they were scored, the last subject scored is shown at the top. While reviewing, the subjects are shown in the same order as in the Codes list.
If markers were scored without subject, the markers are displayed in the row No Subject in the Timeline. Remarks are also displayed in the No Subject row.

To annotate after session recording
procedure
- Open a recorded session (see Review sessions) and play it. This locks the session for other users, who can now only view the session and cannot score markers.
If you have a multiple-location recording, use the carousel control to open the location you want. See To open locations with the carousel control.
- Click on Codes in the lower-left corner of your screen to open the Codes tab.
-
If you did not select a Codes list during session recording, click this button to select one. Also use this button to change the codes list. This is possible until you score the first marker.

-
Annotate, following the same procedure as in Annotate.
During session playback you can only score subjects and markers from the same list that you used during session recording. However you can add subjects and markers for this session. See To add codes during session recording -
To save changes before you exit the session, press Ctrl +S. The markers are also saved if you exit the session

NOTE You can select codes lists created by others, but you can only annotate your own sessions, the sessions for which you received ownership or annotator rights.
NOTE Others cannot view scored markers and remarks when you are recording and annotating a session.
NOTE Others can view the scored markers and remarks when a recorded session is edited. To do so, open the Sessions tab and open the session. The markers and remarks appear when the person that edits the session saves it (Ctrl + S).
Annotations in a multiple-location recording
If you selected multiple locations, it depends on whether you Select multiple locations to record separate sessions for each location or Select multiple locations to record a composite session how annotations are stored. Annotations are linked to the sessions, not to the location. See below for the difference.
Separate sessions
Each session has its own annotations. This means that you can annotate the separate sessions differently. The annotations are stored for the location you have open on your screen while you are annotating. Codes you add during session recording will be added to codes list of the session that is open on your screen only.
Composite session
The composite session will have one Event log. The Event log for the different locations is the same, independent from which location is open on your screen. You can open another location and continue with the same Event log. All annotations are stored in the same Event log. Codes you add during session recording are added to the codes list of all locations.
If the user that records a composite session switches locations, a Remark is added to the Event log with the Location name. The Remark has the timestamp the new location has opened.
If you do not have the Annotation Module, no Remark is added when you change locations during recording.
Enter a remark
aim
To mark something of interest that you did not define in the Codes list. This can be done during session recording or afterwards while playing the session back.
prerequisites
- Your license includes the Annotation Module.
- To add remarks during session recording, your user role allows recording (Technician, Administrator, or Trainer).
- To add a remark while playing a session back, you recorded the session, received ownership or annotator rights for the session.
Remarks in a multiple-location recording
If you selected multiple locations, it depends on whether you Select multiple locations to record separate sessions for each location or Select multiple locations to record a composite session how annotations are stored.
Separate sessions
The remarks are added to the session that is open on your screen only.
Composite session
Since all locations have the same Event Log, the remarks are added to all locations.
procedure
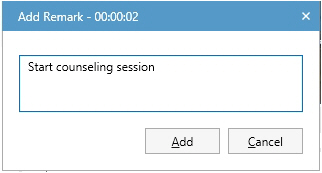
- Click this button, or press Ctrl + R.

- Enter the text and click Add.


NOTE A remark with the location name is added when you switch locations in a composite session.
View annotations
aim
To view the annotations from a session recorded by someone else.
prerequisites
- Your license includes the Annotation Module.
- You either have rights to view the session (Technician, Administrator), you created the session (Trainer), you have received ownership or annotator rights or you are invited to view the session.
- The session has been recorded.
procedure
- Open the Sessions tab.
- Double-click a session to open it.
- Play the session.
The annotations are shown in the Event log and the Timeline
Event log
To view the Event log, open the Events tab at the bottom of your window. To jump to an event in the Timeline and videos, click it in the Event log.
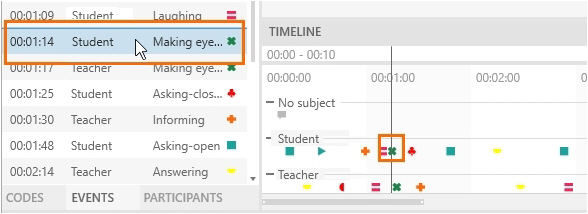
Timeline
- To jump to an event in the videos and Event log, click it in the Timeline.
- To display an event, hover over a symbol.
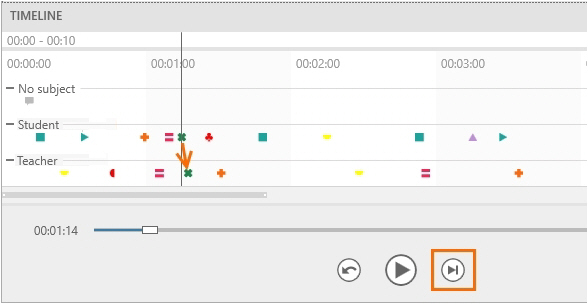
- To move to the next event, click the Skip to next event button or press Ctrl + right arrow on your keyboard.

- To move to the previous event press Ctrl + left arrow on your keyboard.
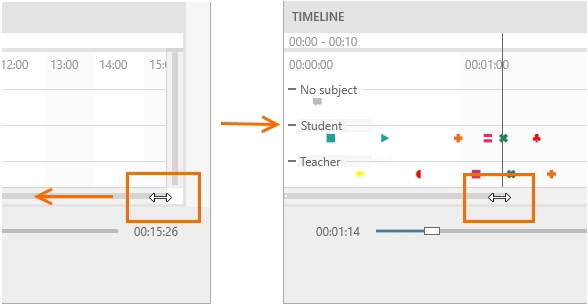
- To zoom in and out the Timeline, hover with your mouse cursor over the Timeline and use your mouse wheel.
- To view an interval in detail, drag the borders of the line below the Timeline.

Playback events
If you want to play back a specific event, set a pre-roll interval to start playing a few seconds prior to the event.
The default pre-roll interval is 5 seconds. The maximum duration you can set is 15 seconds.
Edit scored subjects, markers and remarks
aim
To correct annotation errors.
prerequisites
- Your license includes the Annotation Module.
- Your user role allows session recording (Technician, Administrator, or Trainer).
- If you have the user role Trainer, you created the session, received ownership or annotator rights. Trainees can also receive ownership or annotator rights.
procedure
- Open a recorded session (see Review sessions) and play it.
- To make new annotations, enter them following the procedure in Annotate
To add a remark, press Ctrl + R or click this button.

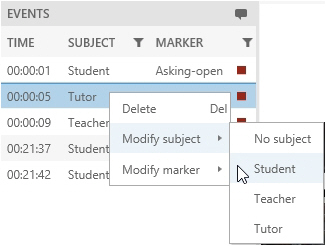
To delete a scored subject, marker or remark, right-click it in the Event Log and click Delete.
To modify a scored subject or marker, right-click it and select Modify subject, or Modify marker. Then choose the correct one.
-
To save the session before you exit it, press Ctrl + S.
-
When done, choose Back. Choose Save to save new edits.


NOTE Others can view the scored markers and remarks when a recorded session is edited. To do so, open the Sessions tab and open the session. The markers and remarks appear when the person that edits the session saves it (Ctrl + S).
NOTE Scored Markers and Remarks can only be edited by the user that created the session and users that received session ownership or annotator rights.
Select another Codes list
aim
To choose another Codes list than the one that was used for scoring and annotate with that list.
IMPORTANT To choose another Codes list, you must delete all annotations from the original list first. The deleted annotations cannot be restored.
prerequisites
- Your license includes the Annotation Module.
- You created the session, received session ownership or annotator rights or are a Technician or Administrator.
procedure
- Open the session.
- Right-click the markers that were already scored in the Event Log and click Delete.
- Click this button and select another Codes list.

Change the annotator
aim
To assign the role of session annotator to another user, for instance, a colleague or one of your students.
prerequisites
- Your license includes the Annotation Module.
- You created the session or received session ownership or you are a Technician or Administrator.
procedure
- Open the Sessions tab to view the list of all the sessions.
- Right-click the appropriate session and select Change annotator.

- From the drop-down list select the name of the person who you want to assign the role of annotator to and click OK. By default, the person who recorded the session is the annotator.

Reclaim the role of annotator
aim
To claim back the role of annotator that you gave to another user, for instance, a colleague or one of your students.
prerequisites
- Your license includes the Annotation Module.
- You created the session or you received session ownership or you are a Technician or Administrator.
procedure
- Open the Sessions tab to view the list of all the sessions.
- Right-click the appropriate session and select Change annotator.
- Select your name and click OK.
Customize the Session window
What do you want to do?
- Dock/Undock Event log or Time Line
- Dock/Undock panes and tabs
- Display a selection of events
- Collapse all subjects
Dock/Undock Event log or Time Line
You can undock and move the Event log and Time Line window, for example to display them on a separate monitor. To dock the windows again, drag the window to the main Viso window. Docking buttons appear. Move the window to one of these docking items. A blue rectangle now shows where the window will be positioned. Release the mouse button.

Dock/Undock panes and tabs
You can undock the pane with the Events, Codes and Participant tabs, and the individual tabs. It can, for example, be useful to move the Codes tab to a separate monitor.
Docking/undocking of panes and tabs applies to Viso Viewer and is implemented for all users.
To undock a pane with its tabs
Click the title and drag it to a new position.
To dock a pane again, drag it to the main Viso window. Docking buttons appear. Move the pane to one of these docking items. A blue rectangle now shows where the pane will be positioned. Release the mouse button.
To undock a separate tab
Click the tab at the bottom of the pane and drag it to a new position.
To dock the tab again, drag it to the main Viso window. Two types of docking buttons appear.
If you release the mouse button while it is positioned on the docking button shown in the figure below, it is re-docked in the pane.
If you release the mouse button while it is positioned on the docking button shown in the figure below, the separate tab is docked in the Viso window.
Display a selection of events
aim
To select a subset of events in the Event log and, optionally, in the Timeline. This can be useful to, for example, quickly display all behaviors of one subject, or a specific behavior of all subjects.
procedure
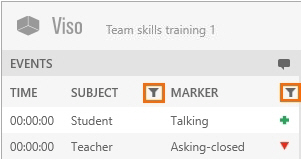
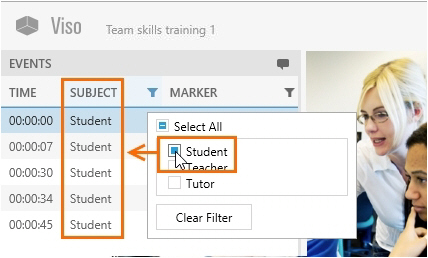
- Open the Events pane.
- Click the filter button next to Subject or Marker.

- Specify the selection. The result is shown in the Event log.
The filter is also applied in the Timeline.

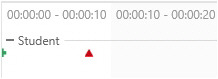
To disable the filter in the Timeline
To see in what context the selected events took place, you may want to display all events in the Timeline, instead of only the ones specified in the Event log filter. To do so:
- Right-click the Timeline.
- Select Show all events.

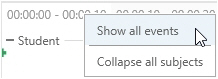
NOTE To restore the filter in the Timeline, right-click it and select Show filtered events only.
Collapse all subjects
aim
To quickly collapse all subjects in the Timeline, so that no markers are shown. You can then expand the subjects that you are interested in to view only their markers.
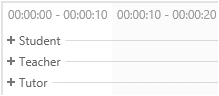
procedure
Right-click the Timeline and select Collapse all subjects.
NOTE To expand all collapsed subject again, right-click the Timeline and select Expand all subjects.
Export annotations to text file
aim
To export the annotations to a Comma Separated Value text file (CSV-file) so that you can analyze them in another application, like Excel.
prerequisites
- Your license includes the Annotation Module.
- You created the session, have received session ownership or are a Technician or Administrator.
procedure
- Open the Sessions tab.
- Select the sessions to export.
- Right-click one of the sessions and select Export to CSV.
- Choose a location and click Export.
NOTE The export file is named after the imported session, with the location name, and the date and time the session was created added to the filename.
Highlight videos
aim
To select specific point events of interest within sessions and create highlight videos containing these, optionally with subtitles, for further use.
prerequisites
Your license includes the Annotation Module.
The session has been recorded and you received ownership rights for the session.
procedure
- Open the Sessions tab.
- Double-click a session to open it.
- Right-click anywhere in the Timeline or click on the Export highlight video button in the top right corner of the Timeline.

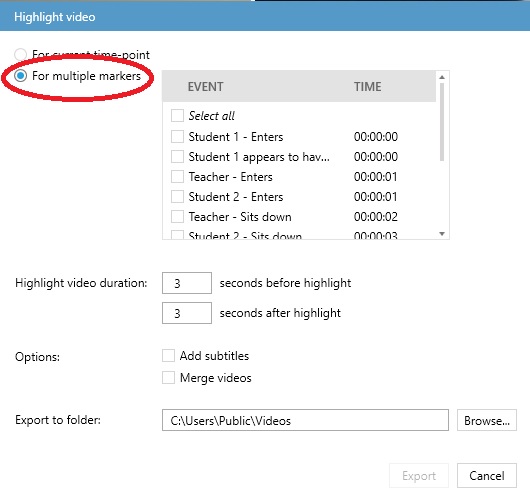
- In the Highlight video window, you have two options to select the point event(s) of the session you wish to include in your highlight video. For a single event, move the Time slider to or near to the particular point event of interest and select For current time point. Continue with Step 7.

If the point events of interest are associated with some or all of the markers you have specified in the Code list you used to annotate your session (see Create Code Lists and Annotate) select For multiple markers. Continue with Step 5.
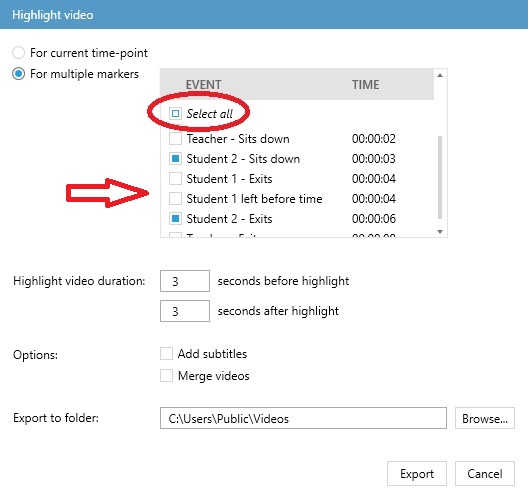
- If you have opted for For multiple markers, a window appears where you can select the point events you wish to highlight. You may select as many of these as you wish by checking the relevant boxes, or select them all using the Select all checkbox.

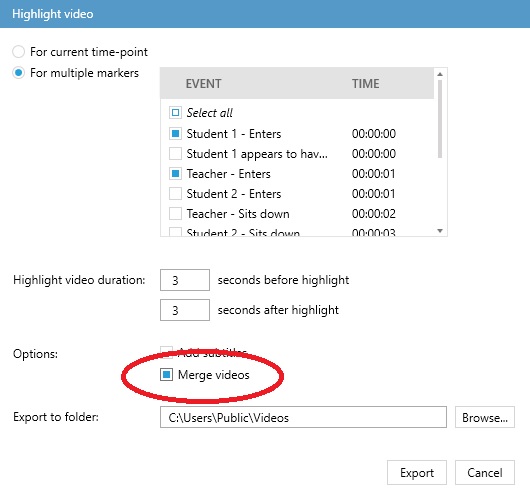
- If you wish to merge all your highlighted point events into a single video, use the Merge videos option.

- Use the Highlight video duration option to set the length of the section including the selected point event. By default, 3 seconds will be added before and after the highlighted point event, but you may adjust this value up to 30 seconds before and 30 seconds after the selected event. If you select an invalid duration, the box will be marked in red and you will not be offered the Export option.


NOTE The Highlight video duration set by you will also include the previously set Pre-roll value. (See Review sessions.)
NOTE If the Highlight video duration set by you exceeds the length of the session, the resulting Highlight video will include the highlighted event more than once, so it is recommended to set the duration shorter than the lenghth of the session.
8. If you wish to add subtitles, check the Add subtitles box at Options. 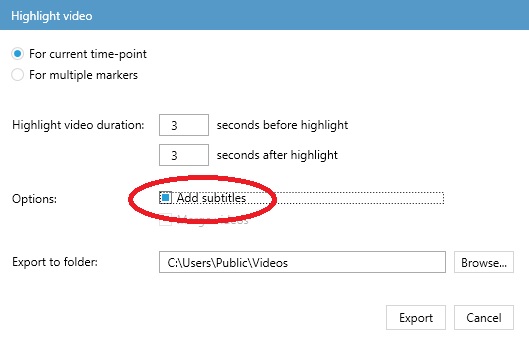 The Subtitles will comprise of the names of the highlighted Events and Subjects involved (see Create Code Lists) as well as any Remark you might have added (see Enter a remark).
IMPORTANT Your subtitles will be saved in a separate vtt file so that you can edit them later if you wish. When reviewing your Highlight video, you will need to select the relevant vtt file and turn on the subtitles. For the details, see Adding subtitles to your hightlight videos.
9. At Export to folder, select the folder where you wish to save your Highlight video. Viso offers you a default option, but you are also free to Browse.

NOTE If more than one cameras were used for recording the original session, a separate highlight video will be created for each, with the same subtitles.
NOTE Viso will create a unique default name for the highlight video for exporting which you cannot change. If you have created subtitles, the vtt file containing these will be given the same unique default name.
10. Once you have made all the necessary settings, press the Export button.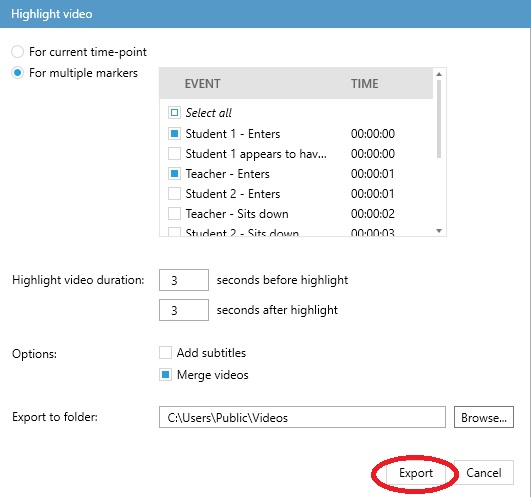
NOTE If you wish to rename the exported highlight video file, you will need to do it later, in the folder. When doing so, it is recommended to give the highlight videos and the related vtt files with the subtiles (if you created any) the same name to facilitate the easy adding of subtitles when reviewing the videos later on.
Adding subtitles to your highlight videos
As mentioned above, your highlight videos and the related subtitles will be saved in separate files. When you wish to see the subtitles while reviewing your highlight video, you will need to select the relevant vtt file containing the subtitles and enable the subtitles function.
procedure
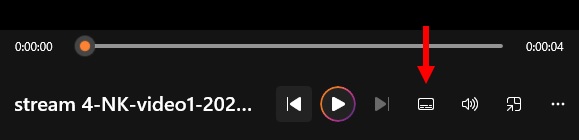
- Open your highlight video e.g. in Windows Media Player or PowerPoint.
- Look for the icon where you can set the languages and subtitles for your video.

- You will be offered a choice of selecting the subtitles from file. Select the relevant vtt file and click Open. Now the subtitles you created will be displayed under your video.
NOTE If you wish to edit your subtitles, you can do it by opening the vtt file in a text editor and make the desired changes.
IMPORTANT When you copy your highlight videos to a different folder, please remember to copy the related vtt files together with them.
Schedule Session Recording
Schedule a session
aim
To schedule session recording in advance.
prerequisites
- Your Viso license includes the Scheduler Module.
- Your user role allows session recording (Technician, Administrator, or Trainer).
procedure
- Open the Scheduler tab.
- Double-click a time slot or press the New schedule button.
- Enter a Session name in the Name field if you did not Specify a default session name.
- Select for single, composite or separate sessions.
- Select the Location from the list.
If composite session or separate session recording is selected, you can select multiple locations.
See Select multiple locations to record a composite session - Optionally, select other users or groups of users from the Participants list to invite them to the session.
See Invite participants - Optionally, edit the Start time, or End time.

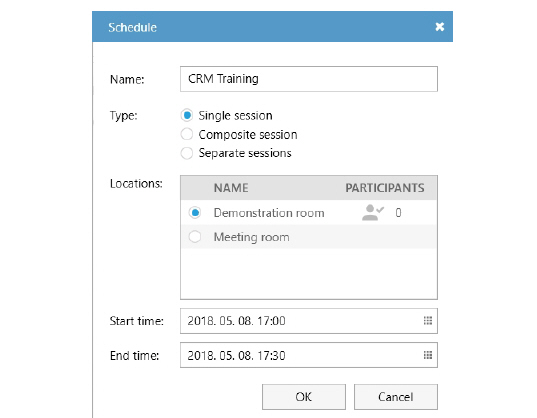
- Click OK. The scheduled session now appears in the Dashboard of the user that created it and the ones that are invited.
See also The Scheduler in detail
Notes
- The Composite and Separate sessions options are only available if the person with the Technician account enabled it in the Recording Methods.
- If you schedule consecutive sessions without gaps in between, recording of the second and third etc. session starts once the previous session was saved. This can result in a recording that is a few seconds shorter than scheduled. It is always recommended to leave a few minutes between recordings.
- Trainees are not able to view the Scheduler. Their Dashboard lists the sessions they are invited to.
- If a user is removed by e.g. the Administrator or the Technician and this person has been included in the list of participants of a scheduled session, the list will be updated automatically by the system.
Manage scheduled sessions
aim
To reschedule or remove a scheduled session.
prerequisites
- Your Viso license includes the Scheduler Module.
- You created the scheduled session, or your user role is Technician, or Administrator.
Modify a session
- Open the Scheduler tab.
- Double-click the scheduled session.
- Edit the Schedule and click OK.
Delete a session
- Open the Scheduler tab.
- Select the schedule and press the Delete key on your keyboard or the X icon.
NOTE You can only delete a scheduled session in the Scheduler. Not a session that has been recorded. To delete a recorded session, see Manage sessions.
The Scheduler in detail
What do you want to do?
- Select the current day in the calendar
- Select locations to display in the calendar
- Select the time period to display in the calendar
- Change the date and time format
- Read about Scheduled and recorded sessions in the Scheduler
- Read about Scheduled and recorded sessions in the Dashboard
- Read about Priority of scheduled and manual sessions
Select the current day in the calendar
If you selected another day in the calendar, click the Today button to select the current day.
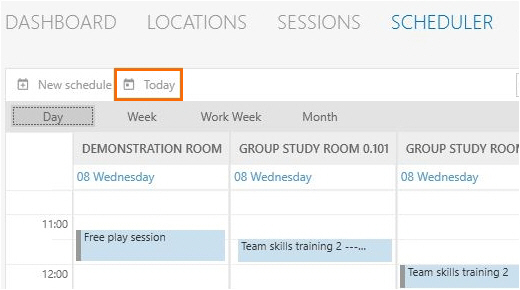
Select locations to display in the calendar
Open the Locations list in the top-right corner of your window. Select the locations to display. Locations that appear offline are either having connectivity issues or simply are not selected for recording by your colleague who manages the Viso set-up. If all locations appear offline, then the Viso Recorder Manager may not be running or is disconnected.
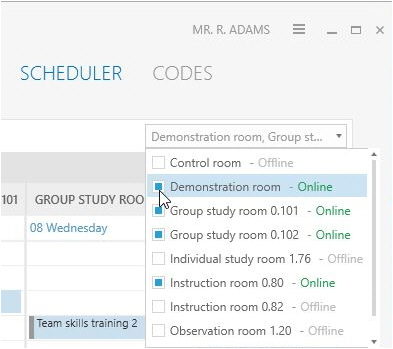
Select the time period to display in the calendar
Click the Day, Week, Work Week or Month button on the toolbar. By default the current day is displayed. The work week is the week from Monday till Friday. Your colleague who manages the Viso set-up can change the default work week and working hours.
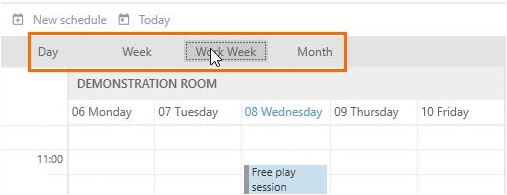
Change the date and time format
Change the date time format of the scheduler in the computer’s regional settings.
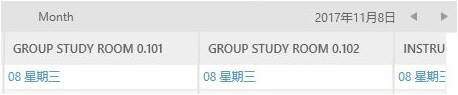
Procedure:
- Type Date in the Apps window and choose Date & time settings.
- Click Additional data, time & regional settings in the upper-right corner of the window.
- Under Region, choose Change data, time, or number formats.
- Select a region from the Format list and click OK.
- Restart Viso.
NOTE The time format is also used in the calendar of the Dashboard.
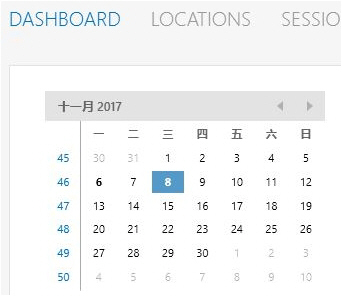
Scheduled and recorded sessions in the Scheduler
The scheduler can be viewed by anyone in the Viso network with the proper rights. However the details shown depend on the user role.
Administrators and Technicians
Administrators and Technicians are able to view all the details of each session.
Trainers
Trainers can open, edit and see all the details of their own sessions. They cannot open or edit a scheduled session they are invited to. For the sessions they are invited to, they can see the session name and the person who created it by hovering over the schedule.

For the sessions they are not invited to, only the name of the person who created it is shown. The title of the session is hidden, only the status is indicated (Scheduled Session, Recording Session...).
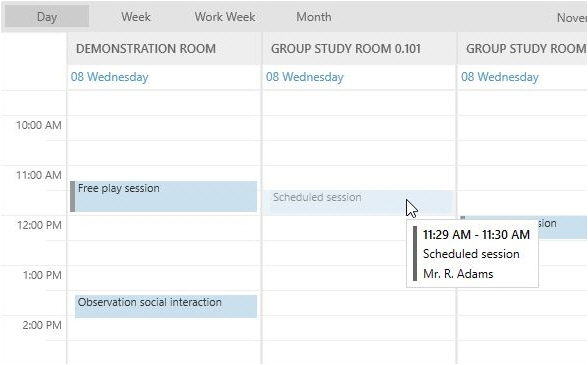
Trainees
Trainees do not have a Scheduler tab. The sessions they are invited to are listed, with the session name and the person that created the session, in their Dashboard.
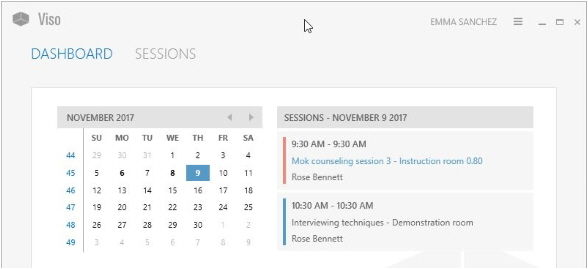
Scheduled and recorded sessions in the Dashboard
When you have the Scheduler Module, the Dashboard contains a calendar and a Session list. Days on which sessions are scheduled or have been recorded are shown in bold in the calendar.
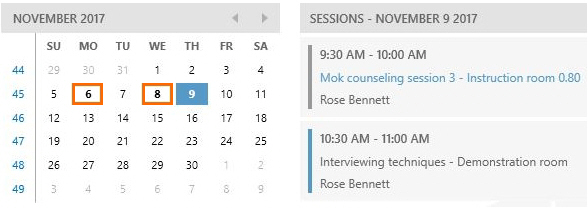
The Session list displays the following for the day you select in the calendar:
- Sessions you scheduled yourself.
- Sessions that you are currently recording, with a link to open them.
- Sessions that you have recorded, with a link to open them.
- Sessions that you received ownership of or annotator rights for, with a link to open them and the name of the person who owns the sessions.
- Scheduled sessions that you are invited to.
- Sessions that are currently recorded and you are invited to, with a link to open them.
- Sessions that have been recorded and you are invited to, with a link to open them.
TIP Click the month in the upper-left corner of the calendar to zoom out in time. Click several times to zoom out more. Then click the time slot in the calendar to zoom in. This way you can quickly access sessions that were, for example, recorded a few months or even years ago.
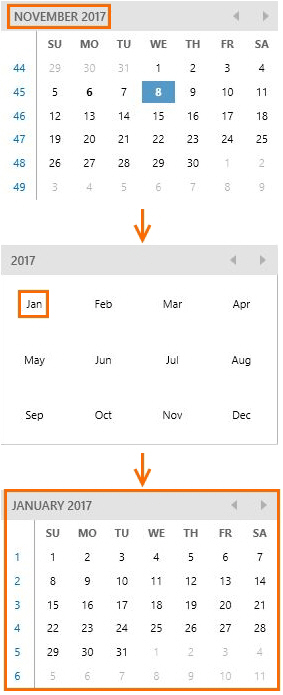
Priority of scheduled and manual sessions
A scheduled session always has priority over a session that you start manually by opening a location and pressing the Start recording button. This means that you cannot open a location when it is in use in a scheduled session recording. Also, a manual session recording will be terminated when a scheduled session with the same location is about to start. You will receive a warning about this. Likewise, if a location is open for viewing, it will be closed when a scheduled session is about to start. You will receive a warning about this.
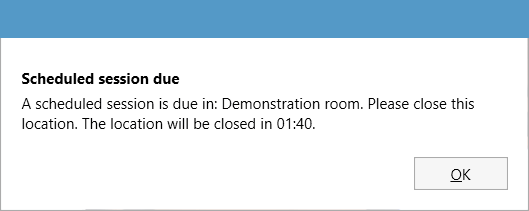
Using a programmable button or The Observer XT to start recording in Viso is similar to starting a recording by hand. A scheduled recording has priority.
Scheduled sessions and manual recordings in multiple locations
If a scheduled session is about to start with a location that is in use in a multiple location recording, the following happens:
- Single session recording – Recording stops in the locations that are selected in the scheduled session. Recording continues in the locations that are not selected in the scheduled session. The scheduled session starts.
- Composite session recording – Recording in all locations stops and the scheduled session starts.
- Separate session recording - Recording is stopped only in those locations which are used for the scheduled session.
See also the following topics:
Select multiple locations to record separate sessions for each location
Select multiple locations to record a composite session
Making an audit report
aim
To export a log file with all the activities regarding video creation, deletion and access of the users of your choice.
prerequisites
- Making an audit trail has been enabled in the settings.
- Your user role allows audit reporting (Technician).
procedure
TIP: The log file is a *.csv file. Open it in Excel. The filename is automatically generated based on the date/time.
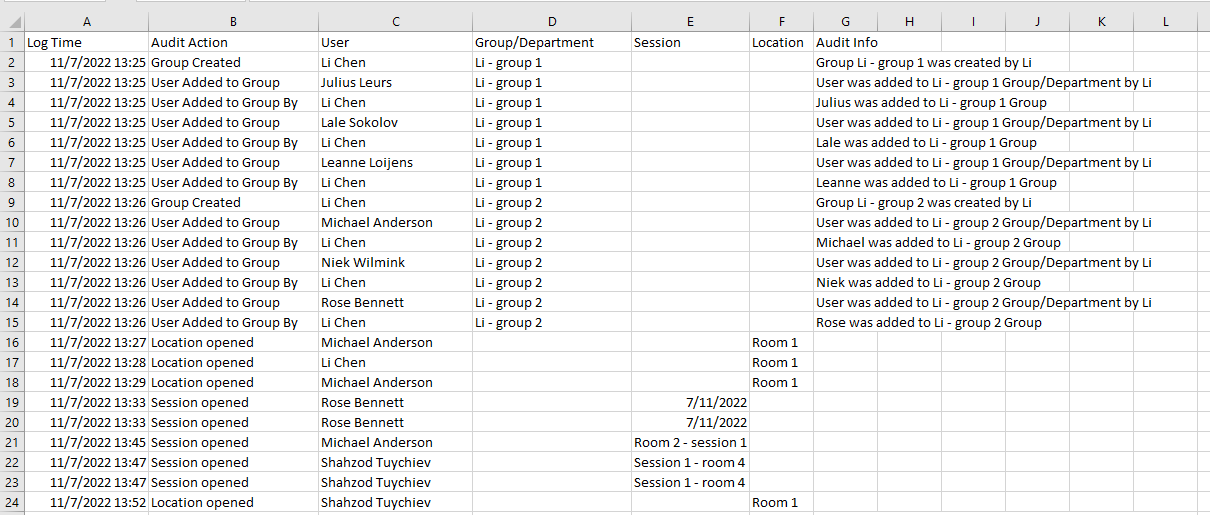
Viso with The Observer XT
Start and stop recording in Viso from The Observer XT
Combining your Viso recordings with other data may give you a more complete picture of the phenomena that you are studying. For instance, when testing your newly developed website, it may be interesting to record the test participant’s screen and annotate his/her verbal reactions but it may be even more intriguing to know what facial expressions your website evokes or what physiological responses. For the integration of all these data you can use The Observer XT.
You can automatically start and stop recording in Viso from The Observer XT and at the same time start facial expression analysis in, for instance, FaceReader (our tool for automatic analysis of facial expressions) and start the acquisition of physiological data. The data streams and Viso recordings can be imported into The Observer XT. You can then view the test participants’ actions, his/her facial expressions and physiological responses and calculate statistics.
NOTE To start and stop recording in Viso from The Observer XT the two programs can be on the same computer or on separate computers that are part of a local network.
prerequisite
If Viso and The Observer XT run on separate PCs - Security certificates need to be set up and trusted on both PCs. See Appendix G ‘Security certificates’ in the Viso Setup Manual for more information.
procedure
- Set up Viso to allow remote control from The Observer XT
- Edit the batch file
- Set up The Observer XT for live observation
- Run a test
Set up Viso to allow remote control from The Observer XT
aim
Prepare Viso to receive commands from The Observer XT.
prerequisites
Your user role allows editing locations (Technician).
procedure
- Open the Locations tab and click the pencil button of the location of your choice.
- Select Remote controlled by and click the Settings button. A window will open with a remote token. You need this token when editing the batch file (see step 3 in Edit the batch file). Click OK. Save the token in a text file in, for instance, Notepad, and press the Copy button to copy the token for use in The Observer XT PC.
- Select who can control the location. The drop-down list shows all users and groups of all departments and also the users that have not been assigned to a department. Select the user who will carry out the test with the test participants and click OK.

-
Repeat steps 1-3 to control more than one location.
-
Log out of Viso and ask the user who is going to run the test to log in.
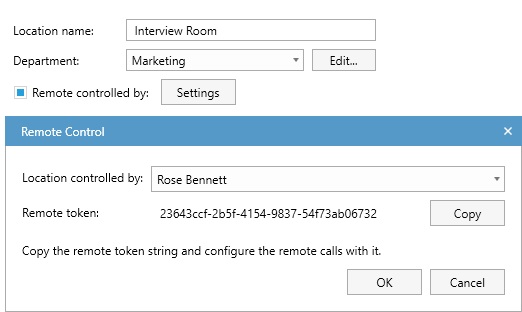
NOTE You can also control Viso with a programmable button.
Edit the batch file
To start and stop recording in Viso from The Observer XT you need two scripts which you can download using your MyNoldus account. You can find the scripts in the Drivers and Tools > Scripts folder, both under Viso and The Observer XT):
- RunPostCommand.bat and
- startstoprecording.ps1
Browse to my.noldus.com if you do not have a MyNoldus account yet.
procedure - 1-PC set-up
Follow the steps below if Viso and The Observer XT run on the same PC.
- Copy the scripts to the Viso/Observer XT PC.
- Open the batch file (RunPostCommand.bat) in Notepad or a similar text editor.
- Specify the location of the ps script.

- Save the batch file.
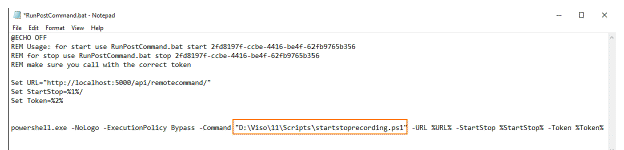
procedure - 2-PC set-up
Follow the steps below if Viso and The Observer XT run on separate PCs.
- Copy the scripts to the Observer XT PC.
- Open the batch file (RunPostCommand.bat) in Notepad or a similar text editor.
- In the first Set line of the batch file
- Change ‘http’ into ‘https’.
- Replace ‘localhost’ with the computer name of the Viso PC.
- Replace port number ‘5000’ in the third line of the batch file with ‘5001’.
To find the Viso Services computer name
Click the Windows icon and type system. Click System Information. You will find the name under System Name. - In the last line of the batch file specify the location of the ps script.

-
Save the batch file.
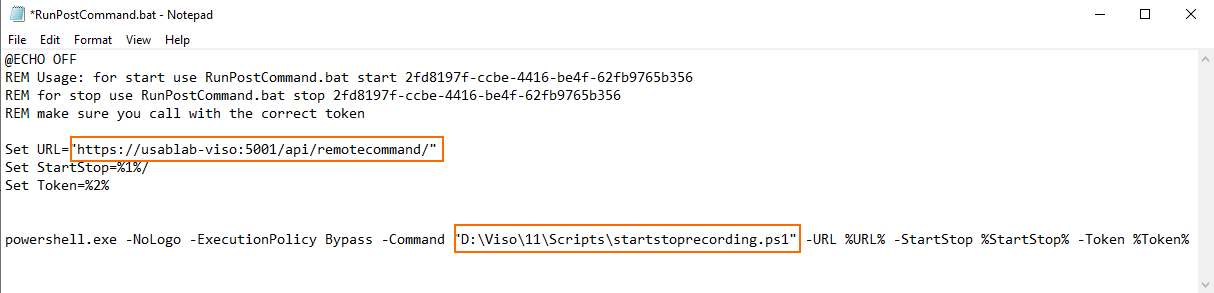
Set up The Observer XT for live observation
procedure
- Open The Observer XT and create a new project.
- Choose Setup >Project Setup and select Live Observation. The Devices window opens. If not, click the Devices button.
- Click Add external program. The Add External Program window opens.

- In the Name field, enter ‘Control Viso’ or a similar name to indicate that these are the settings to control Viso.
TIP: Add the Viso location name when controlling multiple locations from The Observer XT. - Select the checkbox next to Start Observation.
- In the same row, click the ellipsis button next to the Program field and browse to the batch file (RunPostCommand.bat).
- Select the file and click Open.
- In the Command line options field enter ‘start <token generated in Viso for the location>’. This instructs Viso to start recording when you start an observation.
- Select the checkbox next to Stop Observation.
- In the same row, click the ellipsis button next to the Program field and browse to the batch file (RunPostCommand.bat).
- Select the file and click Open.
- In the Command line options field enter ‘stop <token generated in Viso for the location>’. This instructs Viso to stop recording when you stop an observation.
- Leave the ms. before fields of the lines Start Observation and Stop Observation empty.
- Click OK. The Devices list now shows a new device with the name you gave in step 4. Select the checkbox in front of it.
- Repeat steps 3-14 if you want to control more than one location.
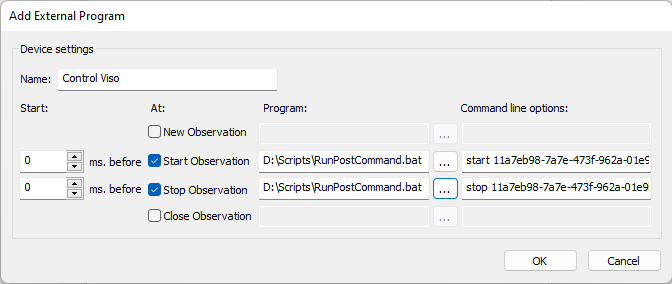
Run a test
procedure
- Invite the participants to enter the test room and check that the cameras are well positioned.
- Create a new observation in The Observer XT.
- Start the observation in The Observer XT. Depending on the settings, the Independent Variable List appears.
- Enter the values of the independent variables and click OK.
- Video recording in Viso starts. Please note that video recording does not start immediately, there is a delay.
- Optionally - Manually annotate events in The Observer XT or in Viso. For more information about manually annotating in Viso see Chapter 6 of this Reference (Annotations). To be able to annotate events in Viso you will need the Annotation module.
- Stop the observation in The Observer XT. Video recording in Viso stops.
- In Viso enter a name for your session. If you specified a default session name, the session automatically gets a name.
notes
- Video recording in Viso does not start immediately when Viso gets the command from The Observer XT. There is a delay. If the delay is less than 10 seconds The Observer XT takes it into account when you import the video. It automatically gives the video an offset relative to the start of the event log. If the delay is more than 10 seconds The Observer XT gives a warning informing you that the delay is, for instance, 10.66 seconds. You need to manually enter this offset in The Observer XT.
- The videos that you record in Viso are not automatically imported in The Observer XT. Please see The Observer XT Help for the procedure (File Management > Import Media Files).
- You can also Import Viso sessions into The Observer XT.
Import Viso sessions into The Observer XT
The videos created by Viso can be opened in the manual annotation program The Observer XT and, optionally, the annotations can be imported into an observation. All codes from the selected Codes list are imported into The Observer XT, independent of whether they were scored or not. Viso subjects are added to the coding scheme as subjects. Markers are added to the coding scheme as point events. Remarks are imported into The Observer XT as comments in the event log. You can create extra codes in The Observer XT and annotate sessions for further analysis.
There are two ways to import Viso sessions into The Observer XT:
- Import sessions directly. This requires communication between The Observer XT computer and the Viso Services computer.
This option is only available with The Observer XT 13 and higher. If you have an earlier version of The Observer XT, Export sessions in Viso and import them in The Observer XT
- Export sessions in Viso and import them in The Observer XT. Use this method if:
- The computer with The Observer XT is not in the same network as the computers with Viso Services and Viso Recorder.
- You have The Observer XT 12.5 or an older version.
Import sessions directly
aim
To import Viso sessions in The Observer XT. This makes use of the Noldus network communication protocol N-Linx.
prerequisites
- You have a license for The Observer XT 13 or a newer version.
- The computers with Viso and The Observer XT are in the same network and set up for communication with N-Linx. The procedure to set this up is present in the Viso Setup Manual.
- You recorded the sessions (Trainer), received session ownership or annotator rights or invitations to view the sessions or your user role is Administrator or Technician.
procedure
- In The Observer XT, choose File > Preferences.
- Open the tab Viso settings.

- Select Use Viso services to connect with Viso.
- In the Services address field, enter the computer name or IP address of the Viso Services computer. Ask your colleague who manages the Viso set-up for the details.
- In the Services port field, leave the default port number 5672.
- Click Test connection. If The Observer XT computer finds the Viso Services computer, the text Connected appears. Click OK.
- Create a new project or open an existing one (File> New/Open Project).
- Choose File > Import > Viso Sessions.
- Enter your Viso login details.
NOTE If you are logged in in Viso, log out first. You can only import the sessions that you are allowed to view.

- Select the sessions and click Import.

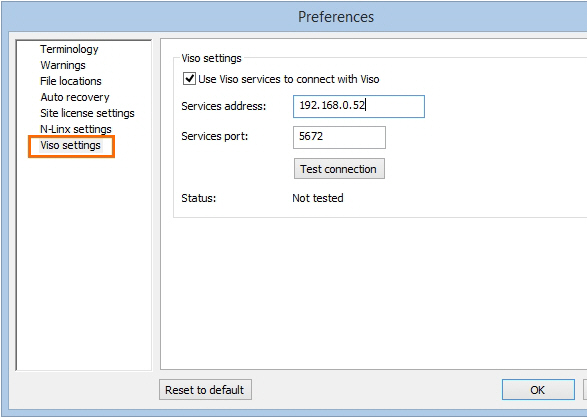
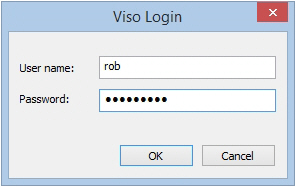
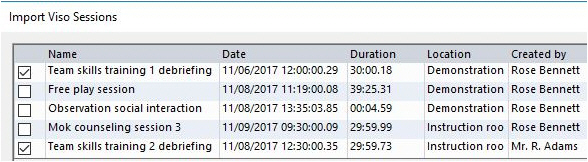
NOTE Each session is imported as a separate observation. The videos are copied to the Video Files folder of The Observer XT. Markers are added to the coding scheme and remarks appear as comments in the Event log (see also How Viso annotations appear in The Observer XT). The observation is named after the imported session, with the location name and the date and time the session was created added to the filename.
NOTE If you have a license for The Observer XT 12.5 or earlier, you cannot import sessions directly into Viso. You must Export sessions in Viso and import them in The Observer XT.
Export sessions in Viso and import them in The Observer XT
aim
To import Viso sessions in The Observer XT if the computers with Viso and The Observer XT are not in the same network, or you have an older version of The Observer XT (see Prerequisites to Import sessions directly).
prerequisites
- You have a license for The Observer XT.
- You recorded the sessions (Trainer), received session ownership or invitations to view the sessions or your user role is Administrator or Technician.
procedure
In Viso:
- Open the Sessions tab.
- Right-click a session and select Export to The Observer XT.

-
Specify the destination folder that can be accessed by The Observer XT, for example its Video Files folder.
-
4.Select if you want to export the separate videos, or combine all videos into one picture-by-picture video per location.
-
Click Export.
You will find the exported videos and the .odx file containing scored markers and comments in the destination folder.
In The Observer XT:
- Create a new project or open an existing one (File> New/Open Project).
- Import the .odx file as a new observation. Choose File > Import > Observational data.

- Select the .odx file and click Open.
- In the Import Observational Data window that appears, select Yes, import new coding scheme elements.
- A message appears whether import is successful. Click Close.
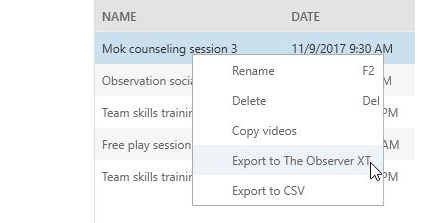
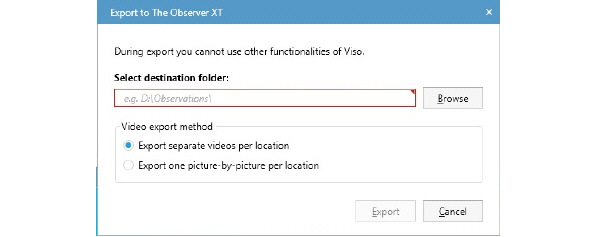
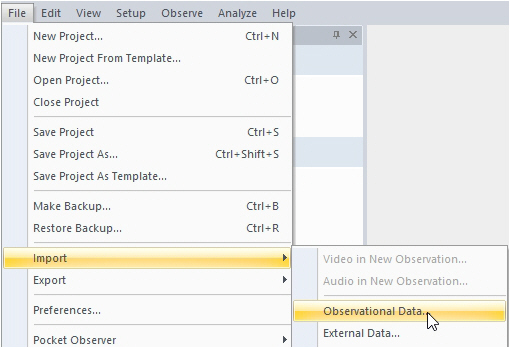
Notes
- Session export to The Observer XT, copies the videos and exports the session as an *.odx file to the specified location.
- If you cannot export the sessions to a location that can be accessed by The Observer XT, you need to copy the files to a location that can. Make sure you copy both the .odx file and the videos to the same location. Do not import the .odx file from, for example, a USB stick, because The Observer XT then will not have access to the videos once the USB stick is removed.
- The videos are automatically linked to the imported observation.
- Subjects and Markers are added to the coding scheme and remarks appear as comments in the Event log.
See also How Viso annotations appear in The Observer XT - The observation is named after the imported session, with the location name and the date time the session was created added to the filename.
- It is also possible to import Viso sessions into an existing observation. For example if you already carried out an observation with the Viso videos. To do so, open the observation and click the Import data button on the toolbar.
Choose Import observational data, select the .odx file and click Open.

How Viso annotations appear in The Observer XT
In the Coding Scheme
In The Observer XT, choose Setup > Open Coding Scheme, to open the Coding Scheme. Viso subjects appear in the Subjects panel. Viso markers are added as Point events in a Start-Stop group. Remarks are not added to the Coding Scheme.
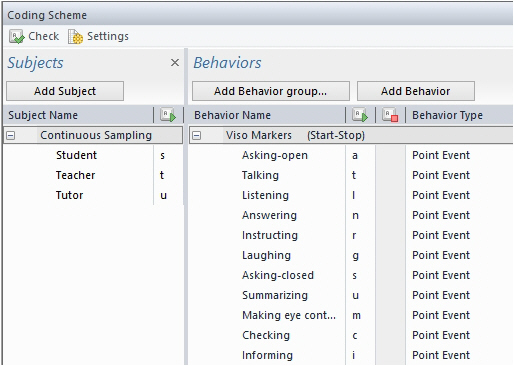
In the observation
Choose Observe > Observation > Open > [session name and time] to view the annotations in the Event Log. Viso Subjects are also Subjects in The Observer XT. Markers are point events and are indicated with blue dots. Remarks are imported as comments in the Event Log.
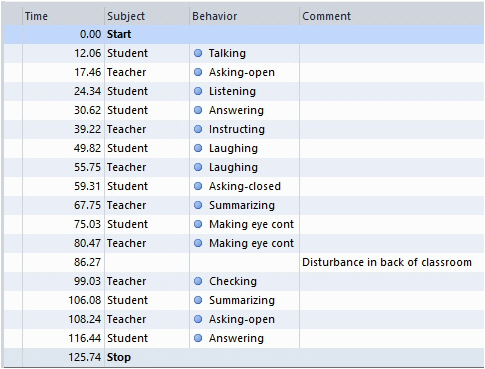
To jump to the video frame at which a certain marker or remark was scored, click its row in the Event Log.
Further analysis with The Observer XT
In The Observer XT you can further analyze your sessions. For example:
- Carry out a Behavior analysis to obtain quantitative data about your session, like the frequency or the latency of a scored marker. See Calculate Statistics in The Observer XT Help.
- Add new elements to the Coding Scheme and annotate the Viso videos. See Set up your Project and Carry out an Observation in The Observer XT Help.
- Select time fragments based on behaviors in the Coding Scheme for further analysis. See Select Data for Analysis in The Observer XT Help.
Technical Support

Viso Menu
Viso Help
Opens the Viso Help. You can search and find help topics.
Noldus Online
If your computer is connected to the Internet, choose this option to go to:
- Viso Home Page – The Viso home page on the Noldus website contains all kind of information about the program as well as examples of how Viso is used.
- Customer Support Center – Brings you to the MyNoldus section on the Noldus website. Create a new account or log into your existing account. On your MyNoldus page you can find the licenses and NoldusCare contracts associated with your account, you can download the latest version of the software, manuals and sample project, contact Support or request a Sales visit.
About Viso
Choose this option to see details of your Viso version, or to open the End-User License Agreement and Acknowledgments of third-party applications.
Technical Support
For questions about this or any other Noldus product, please contact the Support department. From the menu select Noldus Online and then Customer Support Center or browse to https://my.noldus.com. This brings you to the MyNoldus section on the Noldus website. Create a new account or log into your existing account. Under Get support you will find the contact details of the help desk in your region, you can view the status of your current support cases or submit a new support case.
We offer 24 hour support via several help desks in different time zones.
In order to provide adequate support, it is possible that we request you to supply us with video recordings made by your organization. Since May 25th 2018 the new GDPR rules apply to all people in the EEA (EU + Norway, Iceland and Liechtenstein). For this reason we need your signed consent that you agree with the fact that you have given us permission to use these video recordings. Please be aware that the persons who recognizable in the videos also have to give consent that the videos are sent to Noldus Information Technology BV and our technology partners, and that it is your responsibility to arrange this consent. More information regarding our Privacy policy can be found at: https://www.noldus.com/legal/privacy-policy
Troubleshooting
No camera view
This happens if the connection with a camera was lost. Login as Technician. After the connection with the camera is restored, click on the Select for recording checkbox for the location with that camera and click on it again five seconds later, so deselect and select the location. The camera view should now be restored.
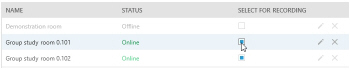
Sound problems
If you hear no sound on your recording, this could be because:
- The speakers of your computer are not plugged in, turned off or their volume is low.
- The Windows volume control is muted or turned low.
- You do not have an audio source connected.
- The recording volume is too low.
Viso is slow
When Viso Viewer, Viso Recorder and Viso Services are all installed on one computer, the software may become very slow and the connection between the components may time out. Note that we recommend to install Viso Viewer on another computer than Viso Services and Viso Recorder.
To make sure that the software does not become slow when all components are installed on the same computer:
- Open the Control Panel and choose Network and Internet > Network and Sharing Center.
- Click Change Adapter Settings.
- Right-click the Local Area Network and select Properties.
- Select Internet Protocol Version 4 (TCP/IPv4) and click Properties.
- Click Advanced and open the tab WINS.
- Select Disable NetBIOS over TCP/IP.
Viso may also become slow if the network cables are not connected properly, or if some cables have defects. If the system is slow, check the speed of the network cables. To do so:
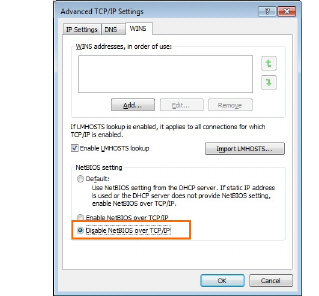
Open the Control Panel and choose Network and Internet > Network and Sharing Center.
- Click Change Adapter Settings.
- Right-click the Ethernet connection you want to diagnose and select Status.

- Check the speed in the window that appears. It should be at least 1 Gb per second.

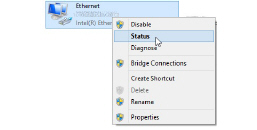
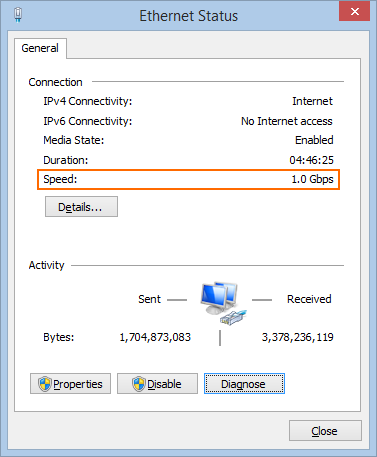
Keyboard shortcuts
Why use keyboard shortcuts
Keyboard shortcuts allow you to use Viso without taking your hands off the keyboard. Using keyboard shortcuts can also help in the prevention of repetitive strain injury. Keyboard shortcuts are only available if the corresponding menu or window is active. Viso has keyboard shortcuts for:
- General functionality
- The Sessions tab
- The Codes tab (Annotation Module)
- Record sessions
- Review sessions
- The menu
When you change the Viso terminology, the shortcut keys remain unchanged. For example, if you change ‘Locations’ into ‘Rooms’ the shortcut key to open the Rooms tab is still Alt+ L.
General functionality
|
Ctrl + L |
Login / logout |
|
|
F1 |
Open Viso Help |
|
|
Alt + F4 |
Exit Viso |
|
|
Alt + D |
Open Dashboard |
|
|
Alt + L |
Open Locations tab |
L |
|
Alt + S |
Open Sessions tab |
|
|
Alt + H |
Open Scheduler tab |
L |
|
Alt + C |
Open Codes tab |
L,A |
|
Alt + G |
Open Groups window |
L |
L – available for users with a role that allows the action.
A – only available with Annotation Module.
You can see the shortcut keys by hovering with your mouse over the menu items.
The Sessions tab
|
Del |
Delete sessions |
L |
|
F2 |
Rename session |
L |
L – available for users with a role that allows the action.
Please note that you need to select a session before you can use the shortcut keys. You can select a session by clicking the downwards or upwards arrow keys on your keyboard.
The Codes tab (Annotation Module)
|
Del |
Delete codes lists |
L |
L – available for users with a role that allows the action.
Please note that you need to select a codes list before you can use the shortcut key.
Record sessions
|
Backspace |
Exit session |
L |
|
Ctrl + Shift + R |
Start / Stop Recording |
L |
|
Ctrl + [n] |
Enable / disable PTZ in video [n] |
L |
|
Ctrl + Shift + [ |
Save 1st PTZ preset |
L |
|
Ctrl + Shift + ] |
Save 2nd PTZ preset |
L |
|
Ctrl + [ |
Return to 1st saved PTZ preset |
L |
|
Ctrl + ] |
Return to 2nd saved PTZ preset |
L |
|
Numpad 1 |
Move camera left-down |
L |
|
Numpad 2 |
Move camera down |
L |
|
Numpad 3 |
Move camera right-down |
L |
|
Numpad 4 |
Move camera left |
L |
|
Numpad 6 |
Move camera right |
L |
|
Numpad 7 |
Move camera left-up |
L |
|
Numpad 8 |
Move camera up |
L |
|
Numpad 9 |
Move camera right-up |
L |
|
Numpad + |
Zoom in |
L |
|
Numpad - |
Zoom out |
L |
|
Alt + [n] |
Enable Push-to-talk in camera [n] |
L |
|
Ctrl + Shift + [n] |
Only show video [n]. Press it again or press Esc to show all previously visible videos. |
L |
|
Esc |
Show all previously visible videos (after double-clicking a video, or pressing Ctrl + Shift + [n]) |
L |
|
Ctrl + O |
Select codes list |
L,A |
|
Ctrl + R |
Add remark |
L,A |
|
Del |
Delete marker, remark |
L.A |
|
Ctrl + Q |
During annotating, switch between Subjects and Markers tab. |
L,A |
|
Page up |
Open next location in carousel control |
L,M |
|
Page down |
Open previous location in carousel control |
L,M |
|
Alt + C |
Switch to Codes tab |
L,A |
|
Alt + E |
Switch to Events tab |
L,A |
|
Alt + P |
Switch to Participants tab |
L |
|
Shift + [n] |
Mute/unmute video [n] |
|
|
Shift + M |
mute/unmute all videos at once |
|
L – available for users with a role that allows the action.
A – only available with Annotation Module.
M - the Setup account selected multiple-location recording.
Control camera with CH products RS Desktop joystick
Viso supports the CH products RS Desktop joystick for Pan, Tilt, and Zoom control of IP cameras. The joystick and buttons are predefined in the following way:
|
Joystick |
Pan, Tilt, Zoom |
|
|
1 |
Enable / disable PTZ in video [1] |
L |
|
2 |
Enable / disable PTZ in video [2] |
L |
|
3 |
Enable / disable PTZ in video [3] |
L |
|
4 |
Enable / disable PTZ in video [4] |
L |
|
5 |
Return to Preset 1 |
L |
|
6 |
Return to Preset 2 |
L |
L – available for users with a role that allows the action.
Review sessions
|
Spacebar |
Play / pause |
|
|
Ctrl + Backspace |
Quick review |
|
|
Backspace |
Exit session |
|
|
Alt + B |
Exit session |
|
|
Ctrl + Shift + [n] |
Only show video [n]. Press it again or press Esc to show all previously visible videos. |
|
|
Esc |
Show all previously visible videos (after double-clicking a video, or pressing Ctrl + Shift + [n]) |
|
|
Ctrl + O |
Select codes list |
L,A |
|
Ctrl + R |
Add remark |
L,A |
|
Del |
Delete marker, remark |
L,A |
|
F2 |
Edit remark |
L,A |
|
F7 |
Create Highlight (only in event log) |
|
|
Ctrl + S |
Save changes to the event log |
L |
|
Ctrl + → |
Skip to next event |
|
|
Ctrl + ← |
Skip to previous event |
|
|
Alt + C |
Switch to Codes tab |
L,A |
|
Alt + E |
Switch to Events tab |
L,A |
|
Alt + P |
Switch to Participants tab |
L |
|
Shift + [n] |
Mute/unmute video [n] |
|
|
Shift + M |
mute/unmute all videos at once |
|
L – available for users with a role that allows the action.
A – only available with Annotation Module
The menu
L – available for users with a role that allows the action.
When you open the menu, the shortcut keys are shown as underscores for each menu item.
The Viso Web App
Log in
aim
To start working with the Viso Web App you need to log in with the login name and password that you received from your colleague who manages the Viso set-up.
prerequisites
Your colleague with the Setup account enabled the Viso Web App and services option (this option is turned on by default). If the Viso Web App is not enabled you can still remotely start and stop recording but you cannot remotely view your locations and neither remotely view session playback.
procedure
- Connect your device to the Viso network.
- Open the web browser and in the address field enter the following: https://<Name or IP address of the computer with Viso Services>:5001. Your colleague who manages the Viso set-up can supply you with these details.
- If you get a message that your connection is not private, click Advanced and then Continue.
- Log in with your username and password.

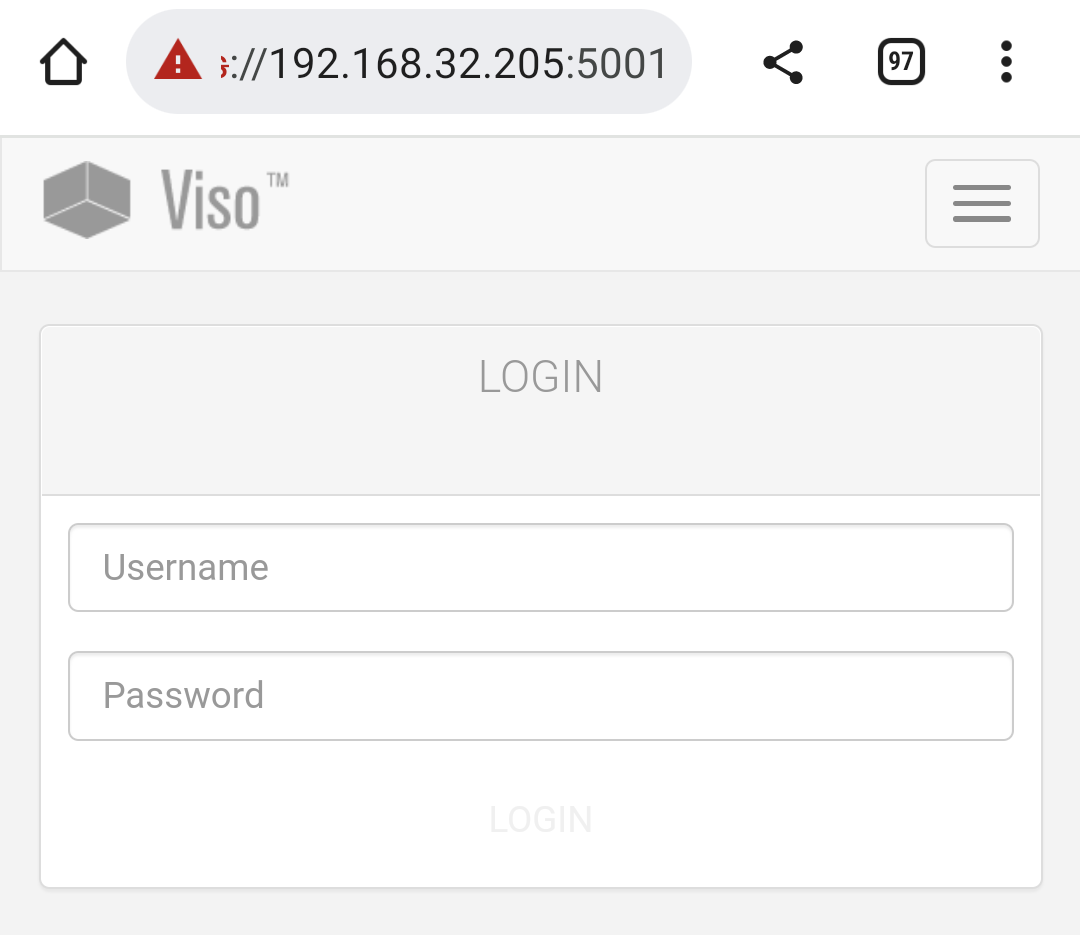
Notes
- When you are logged in, your username is shown in the top-right corner of the Viso window.
Contact your colleague who manages the Viso set-up if you have lost your password.
- You can only be logged in once in Viso, independent whether this is via the regular Viso interface or the Viso Web App. If you log in a second time, you will be logged out on the other Viso (web) interface.
- You cannot log in with the Setup account in the Viso Web App. To get access to the settings and user management options that are available with the Setup account, you have to log in to the regular Viso interface.
- The Viso Web App allows you to remotely start and stop single session recordings. It is not possible to remotely start and stop recording of separate or combined sessions. However, you can remotely playback separate and combined sessions (see Sessions).

View locations and start and stop recording
aim
Remotely view locations and start and stop a (single session) recording.
prerequisite
Your user role must allow session recording (Technician, Administrator, Trainer).
procedure
- Click the Locations tab to view the list of available locations and their status.

-
Click a location to open it. You can view one camera image at a time. If the location has more than one camera, you can switch between the other camera images by clicking the appropriate button. If your colleague who manages the Setup account enabled the picture-by-picture view on your system, you can see a combined view of all streams pressing the All button.

-
If your Viso set-up includes Pan Tilt Zoom (PTZ) cameras you can control them, including zooming in and out. Please note that these features are not intended for following a person as they move about in a room but to set up a predefined location to monitor which thereafter remains fixed.
-
Click the Record button to start recording.
-
When done, click the Record button to stop recording.
-
Give the session a name and save it.

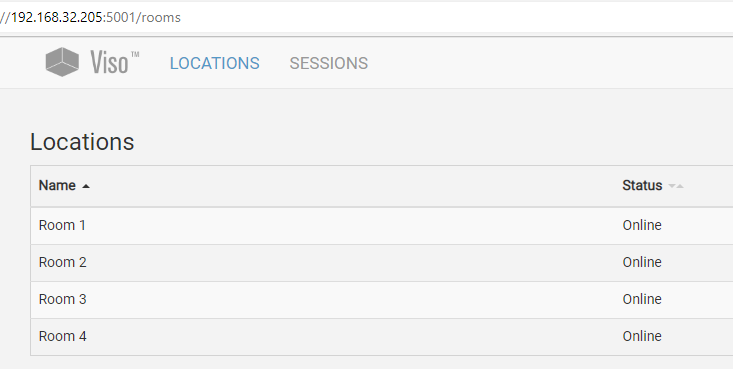
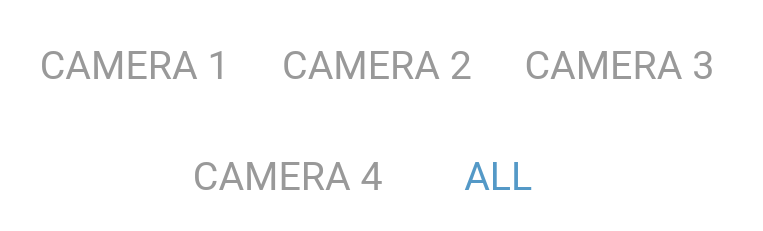
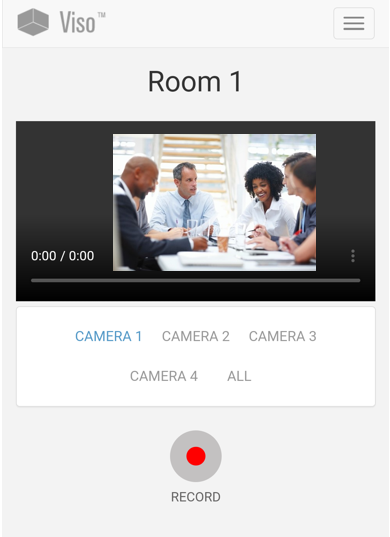
Location status
Locations can have the following status:
- Online – Available for recording.
- Locked – The Location is opened by another user. Administrators and Technicians can open the location, but cannot start session recording. Trainers and Trainees can only open the location if they received an invitation for the session.
- Recording – Recording takes place in that location. Administrators and Technicians can open the location, but cannot start session recording. Trainers and Trainees can only open the location if they received an invitation for the session.
- Offline – The location has not been selected for recording by your colleague who manages the Viso set-up.
- Configuration warning – One camera, or some of the cameras in the location are not configured correctly. Consult your colleague who manages the Viso set-up to solve this. You can record with the cameras that are online.
- Configuration error – None of the cameras in the location are configured correctly. Consult your colleague who manages the Viso set-up to solve this. You cannot open the location.
NOTE If you log out while a session is being recorded, recording continues, even if you shut down the computer/mobile device with Viso. Log in again to stop the recording.
NOTE Technicians can add and edit locations in the regular Viso interface. See the Viso Setup Manual for details.
Sessions
The Sessions tab contains the list with recorded sessions that you are entitled to review. For Technicians, the Session tab lists all recorded sessions. For Administrators, the sessions owned by users of his/her department. For Trainers, only the sessions that they created themselves, received session ownership of, have been assigned annotator for or received an invitation for are listed. For Trainees, the list only contains the sessions they received session ownership of, have been assigned annotator for or received an invitation for.
Sessions can have the following status:
- Recording – The session is being recorded.
- Finished – The session has been recorded and can be reviewed.
- Forced finished – Recording has been stopped for this session. For instance by the Technician or because a scheduled session recording started.
- Invalid – If your PC crashes during session recording, the session will get the status ‘Invalid’.

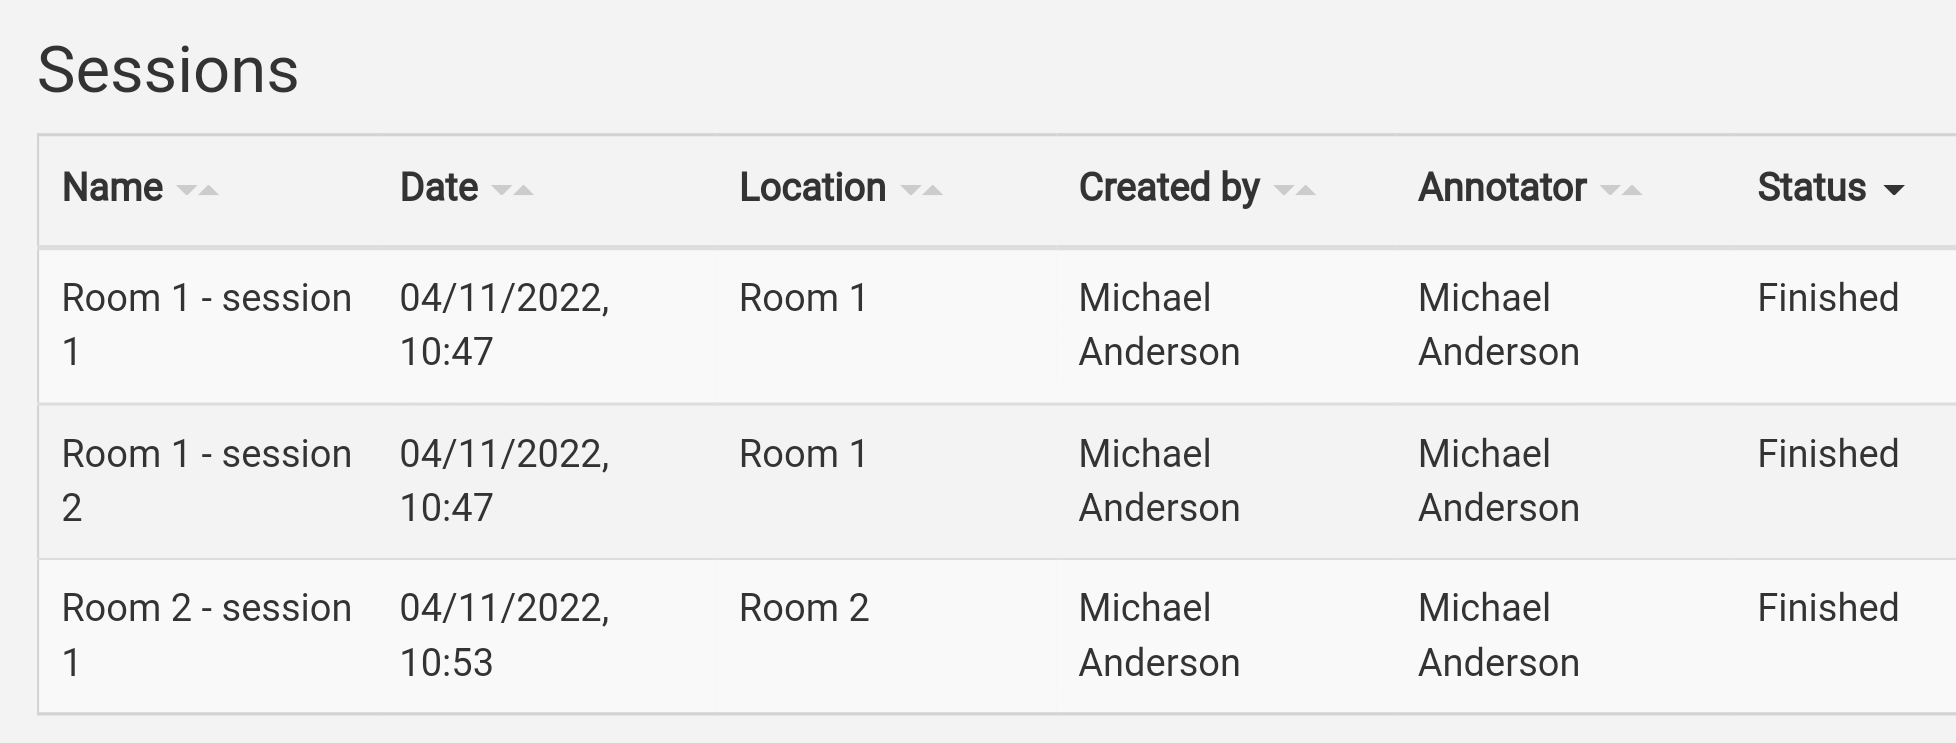
Click a session to open it for review. You can view the session per camera image. If the session has more than one camera, you can view the other camera images by clicking the appropriate button. If your colleague who manages the Setup account enabled the picture-by-picture view on your system, you can see a combined view of all cameras pressing the All button.
If the session has more than one location, you can open the other locations by clicking the appropriate button.