# Set up USB 3 cameras
# Set up USB 3 cameras
## Main topics
- [The steps to install USB 3 cameras](https://bookstack.noldus.com/link/501#bkmrk-page-title)
- [Install the USB 3 interface card](https://bookstack.noldus.com/link/502#bkmrk-page-title)
- [Install the USB 3 camera driver](https://bookstack.noldus.com/link/503#bkmrk-page-title)
- [Connect the USB 3 cameras to the PC](https://bookstack.noldus.com/link/504#bkmrk-page-title)
- [Configure the Basler USB 3 camera](https://bookstack.noldus.com/link/505#bkmrk-page-title)
# The steps to install USB 3 cameras
## Prerequisite
You have USB 3 cameras that supported with MediaRecorder.
See [Supported USB cameras](https://bookstack.noldus.com/link/413#bkmrk-page-title) in [Recording devices](https://bookstack.noldus.com/link/410#bkmrk-page-title)
## Which situation applies to you?
- You ordered the computer, cameras and MediaRecorder from Noldus IT.
In case of Basler USB 3.0 cameras, your computer has a USB 3 card and its drivers are installed. The cameras are configured. Also MediaRecorder has been set up to use with these cameras. You can connect your cameras and start recording.
See [Connect the USB 3 cameras to the PC](https://bookstack.noldus.com/link/504#bkmrk-page-title) and [Record video](https://bookstack.noldus.com/link/439#bkmrk-page-title)
- You bought the computer somewhere else.
Carry out the entire [Procedure](#bkmrk-procedure) below.
## Procedure
1. In case of Basler USB 3 cameras, install the supported USB 3 interface card, even if your computer already has USB 3 ports.
See [Install the USB 3 interface card](https://bookstack.noldus.com/link/502#bkmrk-page-title)
2. Carry out the prerequisite steps before installing MediaRecorder.
See [The steps to install MediaRecorder](https://bookstack.noldus.com/link/408#bkmrk-page-title) in [Installation](https://bookstack.noldus.com/link/409#bkmrk-page-title)
3. Install (MediaRecorder with) the camera driver. Installing the camera driver is only needed for the Basler USB 3 camera. For the Logitech BRIO no driver installation is needed.
See [Install the USB 3 camera driver](https://bookstack.noldus.com/link/503#bkmrk-page-title)
4. [Connect the USB 3 cameras to the PC](https://bookstack.noldus.com/link/504#bkmrk-page-title)
5. [Configure the Basler USB 3 camera](https://bookstack.noldus.com/link/505#bkmrk-page-title)
## See also
[Supported USB cameras](https://bookstack.noldus.com/link/413#bkmrk-page-title) in [Recording devices](https://bookstack.noldus.com/books/mediarecorder-65-reference-manual/chapter/recording-devices "Recording Devices")
# Install the USB 3 interface card
MediaRecorder was tested with the following USB 3 interface cards:
- U3-PCIE1XG205 -1S - You can connect one USB 3 camera to this card.
[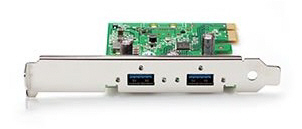](https://bookstack.noldus.com/uploads/images/gallery/2023-12/IbMsbmZAAA5yElT1-image.png)
- Fresco Logic U3X4-PCIE4XE111 rev 1.1 - You can connect up to four USB 3 cameras to this board.
## To install the USB 3 interface card
1. Turn off your computer and all connected peripherals, such as the monitor and printer. Make sure that the computer is unplugged.
2. Remove the PC's case according to the instructions provided in the PC's user manual.
3. Select a free **PCIe** expansion slot, and remove the corresponding extension cover. For details about PCIe slots, see [PCIe slot properties](https://bookstack.noldus.com/link/464#bkmrk-page-title) in [Set up analog cameras](https://bookstack.noldus.com/link/463#bkmrk-page-title)
4. Unpack the USB 3 interface card, place it into the slot, and press it carefully into position. If the card does not fit into place easily, remove it and repeat the operation.
5. Fix the card to the chassis and re-fit the computer's cover.
If you have a 4-port Fresco Logic U3X4-PCIE4XE111 rev 1.1 board, make sure the board receives power from the PC. Connect the power connector on the board (Molex/IDE male 4-pin DC) to one of the power supplies inside the PC. Connector types vary between computers. Many computers have a SATA 15-pin power connector. Use an adapter cable with a 4-pin female Molex connector at one end and a SATA 15-pin connector at the other end. [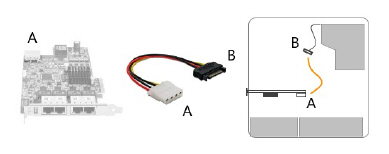](https://bookstack.noldus.com/uploads/images/gallery/2023-12/3joCHUeA5oNcHQ7T-image.png)
# Install the USB 3 camera driver
## Aim
To install the software that allows communication between your camera and the operating system of the computer with MediaRecorder.
## Prerequisites
- You have the Basler USB 3 camera.
- You have installed the USB 3 interface card.
See [Install the USB 3 interface card](https://bookstack.noldus.com/link/502#bkmrk-page-title)
- You carried out the prerequisite steps before installing MediaRecorder.
See [The steps to install MediaRecorder](https://bookstack.noldus.com/link/408#bkmrk-page-title) in [Installation](https://bookstack.noldus.com/link/409#bkmrk-page-title)
- **IMPORTANT** If you upgraded from a previous MediaRecorder version and had old drivers for the camera installed, you uninstalled them first.
### To uninstall old drivers
1. Open the **Control Panel**
2. Choose **Program and Features.**
3. Select **Pylon Camera Software Suite** and choose **Uninstall**.
### Install the camera drivers for the Basler USB 3 camera
### If you did not yet install MediaRecorder
1. Download the installation files from my.noldus.com, and extract the contents.
2. Browse to the file **MediaRecorder 6 Setup.exe** and double-click it.
3. In the **Drivers and tools** field, choose **Basler USB Camera driver** - pylon \[version number\].
4. Click **Next**, accept the License Agreement and click **Install**.
### If you already installed MediaRecorder
Follow the instructions in [If you did not yet install MediaRecorder](https://bookstack.noldus.com/link/503#bkmrk-if-you-did-not-yet-i) and choose Modify in the installation window.
Alternatively:
1. Download the necessary files from my.noldus.nl and extract the contents.
2. Browse to **Drivers\\Basler\\7.1.0.25066
**
3. Double-click the file **Basler\_pylon\_7.1.0.25066.exe**.
4. Agree to the terms in the License Agreement.
5. In the Profiles window, choose **Camera user** and click **Next**.
6. As camera type, choose **USB** and click **Next**. [](https://bookstack.noldus.com/uploads/images/gallery/2023-12/cV211hvdUCu3yXw8-image.png)
7. Optionally, change the location where the camera drivers are stored and choose **Next > Install**.
### To uninstall old drivers
1. Open the Control Panel
2. Choose **Program and Features**.
3. Select the Basler camera driver and choose **Uninstall**.
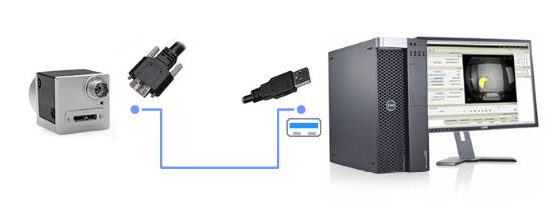
# Connect the USB 3 cameras to the PC
Connect the cameras to the USB 3 interface card of the MediaRecorder computer.
[](https://bookstack.noldus.com/uploads/images/gallery/2023-12/9IbAEN93ogFsUP6w-image.png)
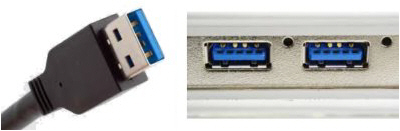
**TIP** USB 3 connectors and ports can be recognized by their blue color coding.
[](https://bookstack.noldus.com/uploads/images/gallery/2023-12/c8T6fRxXTXowU4yi-image.png)
Or by a double-S in front of the USB icon.
[](https://bookstack.noldus.com/uploads/images/gallery/2023-12/vpfwGcoDS4hUuMWq-image.png)
## Important note
- Using multiple Basler USB 3 cameras with a laptop is not supported.
# Configure the Basler USB 3 camera
## Aim
To adjust settings in the USB 3 camera, like the video frame rate, resolution, and exposure.
**NOTE** The camera settings are stored by the camera itself, not on the PC. When you work with multiple cameras, repeat the procedure for each camera.
## Procedure
1\. Make sure MediaRecorder (and EthoVision XT, when present on the computer) are not running.
2\. Start the **Basler Pylon Viewer** software that comes with the USB 3 camera.
[](https://bookstack.noldus.com/uploads/images/gallery/2023-12/sW14ePoY0reRVCJA-pylon-viwer-icon.png)
**NOTE** The Basler Pylon Viewer software is installed automatically when you install the camera drivers.
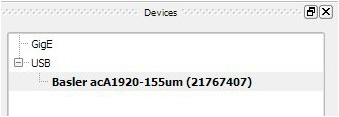
3\. In the **Devices** panel, under **USB**, double-click the Basler camera.
[](https://bookstack.noldus.com/uploads/images/gallery/2023-12/MFl40aeC3H0i6eRu-image.png)
4\. Under **Features**, open the item **Basler acA1920-155um** and choose the settings you would like to change. For details, see the corresponding settings in [Configure the cameras](https://bookstack.noldus.com/link/494#bkmrk-page-title) in [Set up GigE cameras](https://bookstack.noldus.com/link/475#bkmrk-page-title).
5\. Save the settings under **User Set Control**.
### See also
- [Supported USB cameras](https://bookstack.noldus.com/link/413#bkmrk-page-title) in [Recording devices](https://bookstack.noldus.com/link/410#bkmrk-page-title)