Set up GigE cameras
- Set up GigE cameras
- The steps to install GigE cameras
- Connect the GigE cameras to the PC
- Install MediaRecorder with the camera drivers
- Set camera IP address
- Configure the cameras
Set up GigE cameras
Main topics
- The steps to install GigE cameras
- Connect the GigE cameras to the PC
- Install MediaRecorder with the camera drivers
- Set camera IP address
- Configure the cameras
The steps to install GigE cameras
Prerequisites
- The network allows data transfer of at least 1 Gb per second.
- We recommend to use a dedicated network for the cameras.
- The cables must be suitable for Gigabit Ethernet. The minimum cable quality is CAT5e.
https://en.wikipedia.org/wiki/Category_5_cable
- You have GigE cameras that are supported with MediaRecorder.
See Supported GigE camera in Recording devices
Which situation applies to you?
- You bought the computer, cameras and MediaRecorder from Noldus IT.
The cameras are already installed. Also MediaRecorder has been set up to use with these cameras. Connect the cameras to the computer and start recording.
See Connect the GigE cameras to the PC and Record video
- You bought the cameras from Noldus IT and installed MediaRecorder on your own computer
The camera IP address has been set and the cameras are configured.
Carry out the Procedure below but skip steps 6 and 7.
- You bought the computer and cameras somewhere else.
Carry out the Procedure below.
Procedure
- Install the Ethernet card. This is the same procedure as for IP cameras.
See Install the Ethernet card in Set up IP cameras.
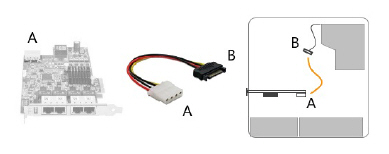
To record from multiple cameras you can use a 4-port PCIe board. MediaRecorder has been tested with the Adlink PCIe-GIE74 Ethernet board.
If you use an Adlink PCIe-GIE74 board make sure the board receives power from the PC. Connect the power connector on the board (Molex/IDE male 4-pin DC) to one of the power supplies inside the PC. Connector types vary between computers. Many computers have a SATA 15-pin power connector. Use an adapter cable with a 4-pin female Molex connector at one end and a SATA 15-pin connector at the other end.
- Give the Ethernet card a fixed IP address. This is the same procedure as for IP cameras.
See Set Ethernet card IP address in Set up IP cameras - Connect the camera to the computer with MediaRecorder.
See Connect the GigE cameras to the PC - Carry out the prerequisite steps before installing MediaRecorder.
See The steps to install MediaRecorder in Installation - Install MediaRecorder with the camera drivers
- Set camera IP address
- Configure the cameras
I bought the cameras from Noldus IT and istalled MediaRecorder on my computer
You must carry out the following steps:
- Install the Ethernet card. This is the same procedure as for IP cameras.
See Install the Ethernet card in Set up IP cameras
If you use an Adlink PCIe-GIE74 board make sure the board receives power from the PC.
- Give the Ethernet card a fixed IP address. This is the same procedure as for IP cameras.
See Set Ethernet card IP address in Set up IP cameras - Connect the camera to the computer with MediaRecorder.
See Connect the GigE cameras to the PC - Carry out the prerequisite steps before installing MediaRecorder.
See The steps to install MediaRecorder in Installation - Install MediaRecorder with the camera drivers
Connect the GigE cameras to the PC
Prerequisite
- You have followed the entire procedure in Ethernet card setup in Set up IP cameras
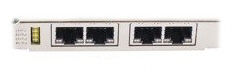
- No matter how many cameras you use, you need a 1Gb Ethernet interface board (desktop computers only).
- When you use a 4-port Ethernet board, you can power the cameras with Power-over-Ethernet (PoE) injectors but you can also choose to connect the board to the power outlet inside the PC. See Power over Ethernet in GigE Vision cameras.
- You must use a 1-Gb Power-over-Ethernet (PoE) injector when the PC does not have a 4-port Ethernet board. Use one PoE injector per camera.
- Cables: Use Cat5e or Cat6e crossover cables.
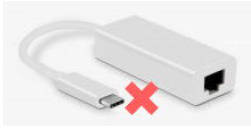
- Do not use an Ethernet to USB adapter (in the picture below) to connect the camera to the PC. Always connect the camera and the PC directly using an Ethernet crossover cable.
Procedure
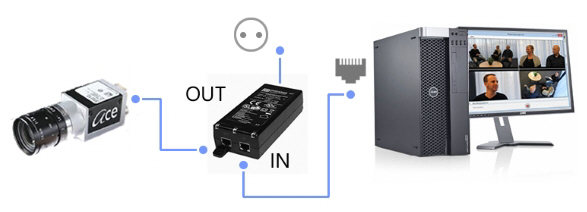
- Using cross-network cables (cat-5e or newer), connect the Ethernet card on the PC to the IN port of the PoE-injector. Connect the camera to the OUT port. Use the short cable between PoE-injector and PC. Use the long cable between PoE-injector and camera.
- Power up the PoE-injector; make sure that the two CONNECT and ON green LEDs are on.
If the green LEDs keep blinking, wait a few more seconds. If you see no change, disconnect the cables, then re-connect them.
Notes
- The Power over Ethernet (PoE) injector is a device that passes power along with data (in this case, video data from the camera) via twisted-pair Ethernet cabling.
- If you have multiple cameras in combination with a 4-port Adlink PCIe-GIE74 board, make sure to connect the cameras one by one and assign an IP address to the camera before you connect the next camera. It is important that each camera is always connected to the same port on the Ethernet board. Each port is viewed as a network adapter, with its own IP address. The information of the linked port is stored in the driver software of each camera. If you swap cameras, they will not be recognized. Therefore, always label the Ethernet ports and the cameras.
Install MediaRecorder with the camera drivers
Aim
To install the software that allows communication between your camera and the operating system of the computer with MediaRecorder.
Prerequisites
- You installed the Ethernet card.
See Install the Ethernet card in Set up IP cameras
- You gave the Ethernet card a fixed IP address.
See Set Ethernet card IP address in Set up IP cameras
- You carried out the prerequisite steps before installing MediaRecorder.
See The steps to install MediaRecorder in Installation
Procedure
important If you upgraded from a previous MediaRecorder version and have old drivers for the camera installed, uninstall them first.
If you did not yet install MediaRecorder
- Download the installation files from my.noldus.com, and extract the contents.
- Browse to the file MediaRecorder 6 Setup.exe and double-click it.
- In the Drivers and tools field, choose Basler GigE Camera driver - pylon [version number].
- Click Next, accept the License Agreement and click Install.
If you already installed MediaRecorder
Follow the instructions in If you did not yet install MediaRecorder and choose Modify in the installation window. Select Basler GigE Camera driver - pylon [version number] and click Update.
Alternatively:
- Download the installation files from my.noldus.com.
- Browse to Drivers\Basler\5.0.9.10388
- Double-click the file Basler_pylon_5.0.9.10388.
- Agree to the terms in the License Agreement.
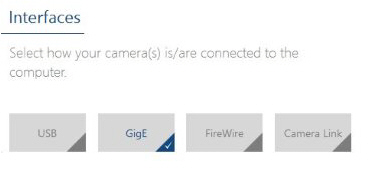
- In the Profiles window, choose Camera user and click Next.
- As camera type, choose GigE and click Next.

- Optionally, change the location where the camera drivers are stored and choose Next > Install.
To uninstall old drivers
- Open the Control Panel
- Choose Program and Features.
- Select the Basler camera driver and choose Uninstall.
Set camera IP address
Aim
To make sure that the IP address of the GigE camera and that Ethernet interface board physically connected to that camera match. This ensures reliable data transfer to and from the camera.
Prerequisites
- You followed the procedure in Ethernet card setup
- You connected the camera. This is the same procedure as connecting an IP camera.
See Connect IP cameras to the PC in Set up IP cameras
Procedure
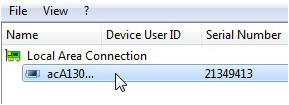
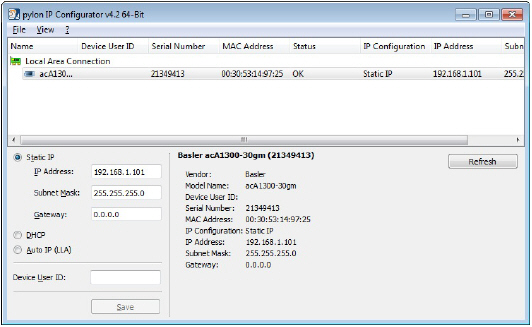
- 1.Double-click the Pylon IP Configuration tool icon on the desktop.

- Select the camera under Local Area Connection.

- Fill in the IP Address and Subnet Mask fields under Static IP Address as supplied by your system administrator.

- Click Save and then Close.
- If you have multiple cameras, connect the next one and repeat the steps above.

Note
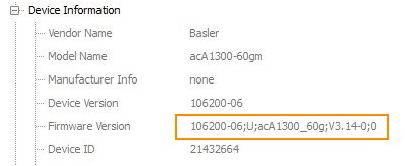
Your cameras should have the same Firmware version. Check this in the Pylon Viewer software. In the Features panel, under Device Information, check Firmware Version. If the cameras do not have the same firmware, an upgrade/downgrade must be done.
Configure the cameras
Aim
To adjust settings in a Basler GigE camera or USB 3.0 camera, like the video frame rate, video frame resolution, and exposure time, within the camera software.
NOTE Settings are stored in the camera software, not on the PC. When you work with multiple cameras, repeat the procedure for each camera.
Procedure (general)
- Make sure MediaRecorder (and EthoVision XT, when present on the computer) is not running.
- Start the Basler Pylon Viewer software that comes with the GigE cameras.
NOTE The Basler Pylon Viewer software is installed automatically when you install the camera drivers.
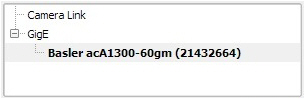
- In the Devices panel, under GigE, double-click the Basler camera.
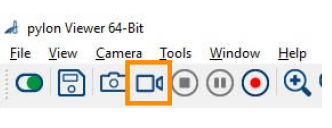
- To preview the camera image, click the Continuous Shot button on the toolbar.
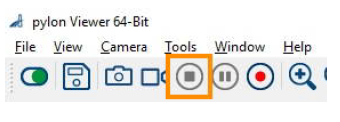
NOTE To be able to adjust the settings, click the Stop button first.

- Follow the instructions below that apply.

 `
`
To center the camera view
With this procedure you make sure the camera view is centered.
IMPORTANT If you center the camera view in MediaRecorder, the settings may not be stored in the camera drivers. Here in Pylon viewer you make sure that the settings are stored in the drivers, also for future recordings.
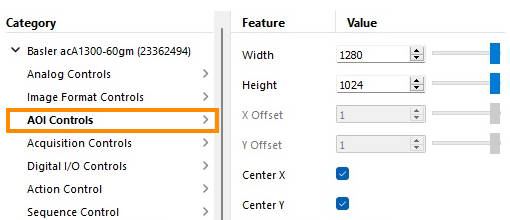
- In the Features panel, open the Basler camera item and then the AOI Controls item (Image Format Control for USB 3 cameras).
- Select both options Center X and Center Y.

- Save the settings.
See To save the camera settings
To set the pixel format
NOTE This option applies to black and white digital cameras.
- In the Features panel, open the Basler camera item and then double-click Image Format Controls.
- Set the Pixel Format to Mono 8.
- Save the settings.
See To save the camera settings
IMPORTANT This corresponds to the option Y800 in MediaRecorder. In Pylon viewer you make sure that the settings are stored in the drivers, also for future recordings.
To adjust the camera exposure time
The exposure time (or shutter time) is the time the camera shutter is kept open to let light in. The exposure time limits the maximum achievable frame rate. If the sum of the exposure time and the time needed for reading the chip (readout time) is greater than the time between consecutive video frames, the next frame may be dropped, resulting in a lower frame rate, and missed samples during tracking.
To adjust camera exposure that matches a frame rate:
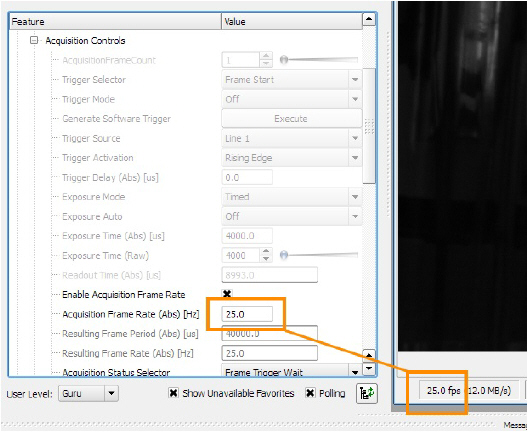
- In the Features panel, open the Basler camera item and then double-click Acquisition Controls.
- Make sure that Exposure mode is Timed, and Exposure Auto is Off.
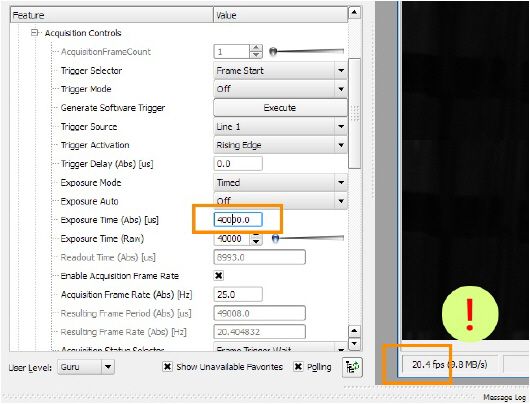
- Next to Exposure Time (Abs) [us], enter the exposure time you require, in microseconds.
For Zebrafish larvae, enter 4000 or 2000, depending on the video resolution chosen.
In all other cases, you may choose a higher value. For rodents a value below 20000 is fine. Faster animals require shorter exposure times.
Press Tab or click another field to confirm. - To check that the exposure time is compatible with your frame rate, click the Continuous Shot button on the toolbar.
At the bottom of the live video window, locate the frame rate resulting with the new exposure time. This should be the same as the one next to Acquisition Frame Rate (Abs) [Hz].

If the resulting frame rate is lower than Acquisition Frame Rate (Abs) [Hz], then either lower the exposure time (this will make the video image darker; open the lens diaphragm to compensate for this), or lower the video resolution. Do this until you see the expected frame rate.

- Save the settings.

See To save the camera settings
To adjust the camera gain
This applies to both color and black/white Basler cameras.
IMPORTANT Increasing gain also increase image noise. Do this only if no other option is left to improve the image brightness. For example, make sure that the lens aperture is maximal, and increase lighting.
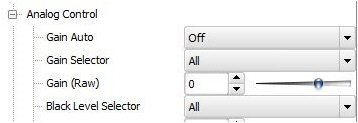
- In the Features panel, click Analog Controls.
- From the Gain Auto list, select Off.
- Next to Gain (Raw) (Gain [dB] for USB 3.0 cameras), select the value you require. A higher Gain results in a brighter image, but also more noise and a grainy image.

-
Save the settings.
See To save the camera settings
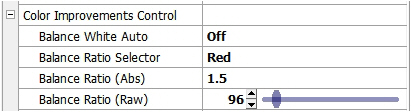
If you have a color camera, you also need to adjust its white balance.
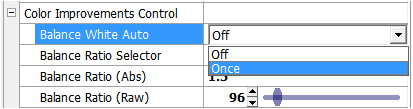
- Click Color Improvements Control.

- Point the camera at a piece of white paper, so that the camera image is entirely white. Click in the field next to Balance White Auto and select Once from the list.

- Save the settings (see below).
To save the camera settings
- Click the Stop button.

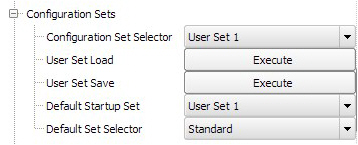
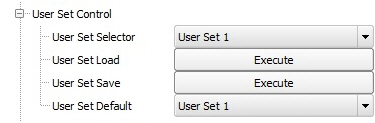
- In the Features panel, open the Configuration Sets item (User Set Control for USB 3 cameras).
- From the Configuration Set Selector list (User Set Selector for USB 3 cameras), select User Set 1.
- Next to User Set Save, click Execute. The camera settings set in the previous steps are now saved under User Set 1.
- From the Default Startup Set list (User Set Default for USB 3 cameras), select User Set 1.
For GigE cameras:

For USB 3 cameras:

- Close Pylon Viewer.

These settings will be used each time you start up MediaRecorder.
TIP You can also save different settings for the same camera in User Set 2 and User Set 3. Under Default Startup Set (User Set Default), select which you want MediaRecorder to use.